
The Chimera Collaboratory allows multiple users at multiple machines to share and contribute to a modeling session. Each user may act on the session, and an action performed by one user is reflected in changes in Chimera for all users involved. Users may even join a session in progress.
The Collaboratory mechanism does not include video or audio teleconferencing, and it is anticipated that other means will be used if these are required. A hands-free telephone setup should suffice in most situations.
For more discussion, see the Chimera Collaboratory project summary.
A comprehensive list of actions shared among Collaboratory users is available. These operations include:
Operations with several Chimera tools are not yet shared among users, but will be in the future.
Before any user can join a Collaboratory session, the session must be started by initiating a hub. This can be done within Chimera or from outside Chimera. Individual user sites (nodes) can then connect to the hub.
The Collaboratory may not work when a node is on the opposite side of a firewall from the hub. In particular, the hub computer must make a TCP/IP connection to the node computer, and vice versa. Either the firewall must be configured to allow incoming CORBA connections, or a virtual private network must be established. Setting Collaboratory preferences may help enable use under certain problematic network conditions.
Starting a session from within ChimeraStarting a session from within Chimera is the simplest approach, although starting it from outside Chimera allows use of some different options. There are several ways to open Start Session, a tool in the Collaboratory category. Start Session invokes the graphical interface to the hub.
| Collaboratory Hub dialog - initial appearance |
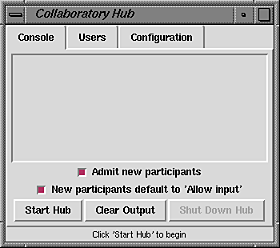 |
The Collaboratory Hub dialog has three sections shown as index cards, Console, Users, and Configuration. Only one card is shown at a time, and clicking the tab for another brings it to the front.
The Console section shows messages from the hub. Admit new participants allows additional users to join the collaborative session. New participants default to 'Allow input' sets the initial status of users so that their operations will propagate to other session participants. Individual user status can be changed in the Users section. Simply clicking Start Hub will start the session; however, any changes in the Configuration section should be made before the hub is started. When the collaborative modeling session is over, the hub can be stopped by clicking Shut Down Hub.
The Users section lists all connected users. Clicking on a name in the list displays information on the individual: name, time connected, platform, and software version (Chimera version/Collaboratory version). Allow input controls whether operations by the individual user will propagate to other session participants. Disconnect disconnects the individual user from the session.
In the Configuration section, a password can be specified for the session. If a password is specified, it must be supplied by anyone joining the session. After the desired string has been entered twice, hitting return or Set Password specifies it as the password. One can also configure the hub to register with a specific naming service. The naming service host acts as a rendezvous point for users to find active Collaboratory sessions (available hubs). The default naming service host, socrates.cgl.ucsf.edu, is maintained for the community by the UCSF Computer Graphics Laboratory. Using this host will be fine in most cases; however, to keep a session private, one can set up and use a naming service on a different computer (see the OmniORB naming service manual). It is necessary to hit return or click Set Naming Service after changing the naming service host.
Starting a session from outside ChimeraStarting a session from outside Chimera allows use of several command-line options, some of which cannot be specified in the graphical interface. The graphical interface will also appear, however, as it does when the session is started from within Chimera.
On UNIX, a hub (session) can be started by the command:
prompt> collaboratoryHub [options]The user's execution path should include chimera_install_dir/bin (by default, chimera_install_dir is /usr/local/chimera).
On Windows, a hub can be started by clicking the icon labeled collaboratoryHub. To use any of the options, a Windows user needs to:
The collaboratoryHub options are as follows:
-d
Turn on extensive debugging information. In most cases, -v will be more useful since it produces less copious output.
-i session_name
Use session_name for the session when it is listed by the naming service. The default session name is the hostname of the computer running the hub.
-n naming_service_host
Use a different naming service host. The default naming service host is socrates.cgl.ucsf.edu.
-p
Establish a password for the collaborative session. The user starting the hub will be prompted to enter and confirm a password.
-vAfter the collaborative modeling session is over, the hub can be stopped with Ctrl-c.
Turn on verbose mode; report what information is being exchanged among users.

After a Collaboratory session has been started, users can join it from within Chimera by starting Join Session. There are several ways to start Join Session, a tool in the Collaboratory category.
| Joining a Collaboratory Session: |
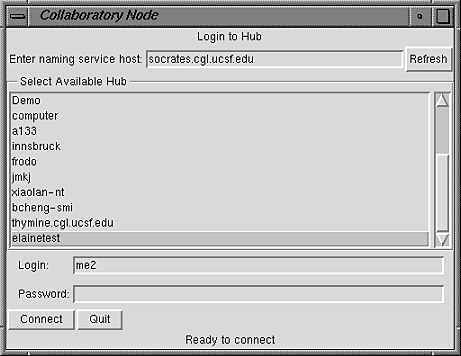 |
By default, the naming service host is socrates.cgl.ucsf.edu and the session name (Available Hub) is the hostname of the computer running the hub. Alternatives can be specified at the time of starting the Collaboratory session. When more than one session name is shown, the user must indicate which is correct. Clicking Refresh runs a check to see if any new sessions have appeared and updates the Available Hub list accordingly.
The login (username) for the Collaboratory session need not match any existing system username. If a password was established at startup, the same password must be supplied to join the session. The username/hostname combination must be different for each participant. Clicking Quit dismisses the setup panel. Clicking Connect dismisses the setup panel and opens another panel representing the session in progress.
Under certain problematic network conditions, the hub may fail to establish a back-connection to the node. Setting Collaboratory preferences may help enable use under these conditions.
| Collaboratory Node Panel |
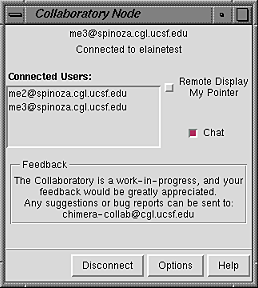 |
The Collaboratory Node panel reports who is currently connected to the session. A user can leave the collaborative session by clicking Disconnect. Clicking Options opens the Node Options panel.
Activating Remote Display My Pointer shows a user's pointer position as a small colored square within the Chimera windows of the other participants.
Activating the Chat checkbox opens an additional panel:
| Chat Panel (shown for two different participants): |
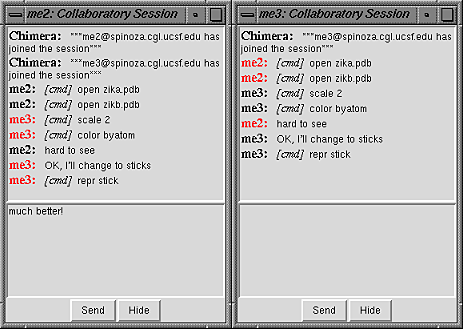 |
The Chat Panel reports who has joined the session and who has disconnected. Commands and text messages entered by session participants are shown next to their Collaboratory usernames. The username and pointer position (if shown) of the first other participant are color-coded red; different colors are used for additional participants. Messages aside from commands can be typed into the lower part of the Chat Panel. Hitting return (Enter) is the same as clicking Send, which causes the message to appear in other participants' panels. It is generally unnecessary to return within a message since the text wraps automatically; however, if a carriage return within the message is desired, it can be indicated using Shift-return. Hide closes the Chat Panel and is the same as deactivating the Chat checkbox on the Collaboratory Node panel.
Node OptionsClicking Options on the Collaboratory Node panel opens the Node Options panel, currently containing one section, Telepresence.
The Telepresence section of Node Options controls how/whether the Collaboratory Node panel's appearance changes to reflect what is happening in the session.