The Model Panel 
Each file of coordinates opened in Chimera becomes a
model with an associated model ID number.
Some PDB files are further subdivided into
multiple structures designated with MODEL
and ENDMDL records;
thus, the
concept of submodels was created to allow unique atom specifications
even when multiple structures in the same file
contain identical residue and atom names.
Submodel numbers are assigned sequentially starting with 1
(#0.1, #0.2, etc.); the numbers in the file are not used.
Each submodel can be treated as a separate model.
Thus, "models" will be used to indicate submodels and/or
models that are not subdivided into submodels.
Nonmolecular models are also given ID numbers.
A molecule model can share a number with one or more
molecular surface models and/or objects
(any of the other model types).
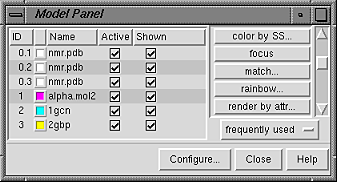
The Model Panel shows the current models and conveniently enables
many operations upon them.
There are several ways to start
the Model Panel, a tool in the General Controls category.
By default, the model-level color
of each molecule model is shown in a
color well.
Clicking a color well
opens the Color Editor and
allows the color to be changed.
Individual models or blocks of models can be
chosen with the left mouse button.
Ctrl-click adds to an existing choice rather than replacing it.
To choose a block of models without dragging,
click on the first (or last) and then Shift-click
on the last (or first) in the desired block.
In the figure, models 0.2 and 1 have been chosen.
Once one or more models have been chosen
within the left side of the Model Panel, any of several
functions represented by buttons on the
right side of the panel can be executed. Each
function is classified as frequently used
or infrequently used; the toggle button below the list
controls which set is listed.
Configure... allows
customization of what is included in the left side of the panel,
which functions are considered frequently used,
and
which functions are applied to double-clicked models.
Close dismisses the Model Panel. Help
opens this manual page in a browser window.
The functions are:
- activate
- activate for motion;
the opposite of deactivate
- activate all
- activate all models even if not chosen in the left side of the panel
(the previous pattern of activities is saved and can be restored using
the button's alternate function, restore activities)
- activate only
- activate the chosen model(s) and deactivate all the others
- add hydrogens
- add hydrogens to the chosen model(s); equivalent to using
AddH
- attributes...
list model attributes and allow changes
- BLAST on PDB
- BLAST the sequence of a single model against sequences in the PDB using the
NCBI BLAST program blastcl3 (Network BLAST, see
BLAST Basic Overview).
This will only work for proteins, and the button will only appear
for users able to run blastcl3 from the system
command line (with arguments but no preceding path).
The E-value and matrix used can be adjusted.
Results are converted to a multiple sequence alignment and displayed
using Multalign Viewer.
- clipping...
open the
Per-Model Clipping tool
- close
- close (remove) the model(s)
- color by SS... color peptides/proteins by secondary structure
with the Color
Secondary Structure tool
- compute SS
- define the secondary structure of peptides/proteins in the chosen model(s)
using ksdssp with the specified
parameter values. Hitting return (Enter) or clicking OK runs
the calculation and dismisses the dialog, while clicking Apply
runs the calculation without dismissing the dialog. Clicking Save as
Defaults saves the parameter settings in the
preferences file;
subsequently, those settings will be used with
the ksdssp algorithm
when peptide/protein structures that lack secondary structure assignments are
read in, when
MatchMaker is used with the
Compute secondary structure assignments option,
or when compute SS is specifically invoked.
- deactivate
- deactivate for motion;
the opposite of activate
- focus
- center the display on the chosen model(s)
- hide
- disable display of the chosen model(s) (see
display hierarchy);
the opposite of show
- match... open the
MatchMaker tool to superimpose structures with similar sequences
and folds;
at least two molecule models must be chosen for this operation to be available
- rainbow...
color the chosen model(s) over a range with the
Rainbow tool
(see also the command rainbow)
- render by attr...
open the
Render by Attribute tool to depict atoms, residues and models
by their attribute values (with color, etc.)
- select
- select
the chosen model(s) for subsequent operations or commands
- select by attr...
open the
Select by Attribute tool to select by attribute values
- select chain(s)...
select
subsequently specified chains in the chosen model(s)
- sequence...
open the sequence panel
showing chain sequences
- show
- enable display of the chosen model(s) (see
display hierarchy);
the opposite of hide
- show all atoms
- show the chosen model(s) and display all atoms within them
- show only
- show the chosen model(s) and hide all of the others
- surface ligand
- display the molecular surface of atoms in the chosen model(s)
determined to be in the ligand category,
if any; equivalent to the command
surface ligand
- surface main
- display the molecular surface of atoms in the chosen model(s)
determined to be in the main category;
equivalent to the command
surface main
- tile
- "tile" the chosen models as described for
EnsembleTile; at least two models must be chosen for
this operation to be available
- toggle active
- toggle the status of each chosen model between
activated and deactivated for motion
(make the status of each its current opposite)
- trace backbones
- in each chosen model,
display only a simplified trace for bonded chains containing
amino acid or nucleic acid residues, consisting of real backbone bonds
(-[N-CA-C]n- in
peptides and -[O5'-C5'-C4'-C3'-O3'-P]n- in nucleic acids)
- trace chains
- in each chosen model,
display only a simplified trace for bonded chains containing
amino acid or nucleic acid residues, consisting of one atom per residue
(connect the CA atoms in peptides, C4' atoms in nucleic acids)
- transform as...
transform each (initially) chosen model using the rotation/translation matrix
of the single model chosen when the dialog's OK button is clicked
- write PDB
- bring up a dialog for
saving models as PDB files
Model Panel Configuration
The Configure... button brings up another panel with three
sections for customizing the Model Panel. The three sections are
organized like index cards with their names on tabs across the top:
Buttons, Columns, and Double Click. Clicking on
a tab brings the corresponding card to the front.
-
The Buttons section
shows all the functions
that can be listed on the right side of the Model Panel.
If a checkbox is activated, the adjacent function
will be included in the frequently used list; the remaining
functions are included in the infrequently used list.
The frequently used/infrequently used toggle button is
below the function list on the right side of the Model Panel.
-
The Columns section
determines which model attributes will
be shown in the left side of the Model Panel.
The descriptions below are in the order in which the columns
would be shown, from left to right.
- ID - model (and submodel, if applicable) number
- (color) - for each molecule model,
a color well
showing the model-level color;
blank for molecular surface models and
other model types
- Name - filename
- Input file - for local files, a pathname (relative if the file
is in a subdirectory of the working directory, otherwise full); for files
fetched from databases,
an identifier or filename for that database entry
- Active - whether the model is
activated for motion;
see activate
and deactivate
- Shown - whether the model is shown;
see hide and show
Show model color behind model name shows the
model-level color of each molecule model
in the Name column, with the text of the name when the model is
chosen, otherwise with a swatch of color behind the name.
- The Double Click section
controls which
functions
will be executed upon
a model when the model is double-clicked in the left side of the Model
Panel. The default is attributes...;
however, there can be zero or many functions in the list for execution.
Clicking an entry in the Function menu
on the right causes it to appear in the Execution list on the left.
Clicking an entry in the Execution list removes it from that list.
The functions will be executed in the order listed.
UCSF Computer Graphics Laboratory / August 2006