Many operations within Chimera can be accomplished in multiple ways. For example, colors and molecular representations can be changed by using the Actions menu or by typing commands into the Command Line. In general, using the menus involves more steps, but does not require one to remember commands and their syntax.
In this tutorial, many of the operations performed with commands in the Getting Started Tutorial - Command Version are carried out using the menus instead. It is useful but not necessary to go through both versions.
To follow along, you will first need to download the PDB files 1zik.pdb and 6bna.pdb into your working directory. (The same files are used in the Command Version.)
On Windows/Mac, click the chimera icon; on UNIX, start Chimera from the system prompt:
unix: chimera
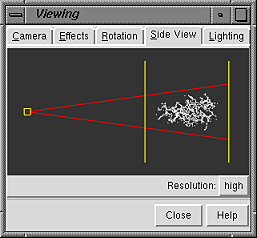
A basic Chimera window should appear after a few seconds. Scaling and clipping operations can be performed with the Side View. There are several ways to start this tool; one is to choose Tools... Viewing Controls... Side View from the menu. Each window or tool can be moved to a convenient location by placing the cursor on its top bar and dragging with the left or middle mouse button. If you like, resize the main Chimera window by placing the cursor on any corner and dragging with the left mouse button.
| Side View |
|---|
|
Now open a structure. Choose the menu item File... Open. From the resulting dialog, choose and open the previously downloaded file 1zik.pdb (the File type should be set to all (guess type) or PDB). The structure will appear in the main graphics window, and a tiny version is shown in the Side View. The structure is a leucine zipper formed by two peptides. Within the Side View, try moving the eye position (the small square; scales the view) and the clipping plane positions (vertical lines) with the left mouse button. The Side View will renormalize itself after movements, so that the eye or clipping plane positions may appear to "bounce back" after you have adjusted them; however, your adjustments have been applied to the main display.
Simplify the display:
Actions... Atoms/Bonds... hideThis shows only the atoms named CA (alpha-carbons) and connects them in the same way that the residues are connected. Try manipulating the structure with the mouse in the main graphics window. By default, the left mouse button controls rotation and the middle mouse button controls XY translation. Continue moving and scaling the structure with the mouse in the graphics window and the Side View as desired throughout the tutorial. Next, thicken the lines:
Actions... Atoms/Bonds... chain trace only
Actions... Atoms/Bonds... wire width... 2
By default, picking from the screen (a type of selection) is done by clicking on the atom or bond of interest with the left mouse button while holding down the Ctrl key. To add to an existing selection, also hold down the Shift key. Try picking two alpha-carbons, one from each peptide (Ctrl-click the first, Ctrl-Shift-click the second). The selection is highlighted in green, and its contents are reported on the button near the lower right corner of the graphics window.
The Actions menu applies to whatever is selected. When nothing is selected, the Actions menu applies to everything.
Label the atoms you have selected, first by atom name and then by residue name and number:
| residue labels |
|---|
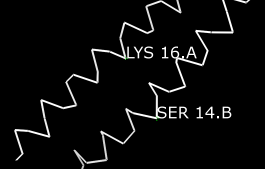 |
Actions... Label... nameEach residue label is of the form:
Actions... Label... off
Actions... Label... residue... name + specifier
res_name res_number.chainIt is now evident that one peptide is chain A, and the other is chain B. To deselect the atoms, pick in a region of the graphics window away from any atoms or use the menu item Select... Clear Selection. Undisplay the residue labels:
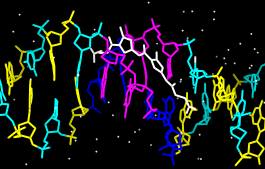
Actions... Label... residue... offColor the two chains different colors:
Select... Chain... ARepeat the process to color chain B yellow. Another way to select an entire chain is to pick an atom or bond in the chain and then hit the up arrow key twice, once to expand the selection to the entire residue and another time to expand it to the entire chain.
Actions... Color... cyan
There is actually another "chain" in this model, not currently displayed: water. This chain ID was assigned automatically when the structure was read in.
Select... Chain... waterAlternatively, the water could have been selected using Select... Structure... solvent or Select... Residue... HOH.
Actions... Atoms/Bonds... show
To display all atoms of the A chain only:
Select... Clear SelectionTo show the backbone only:
Actions... Atoms/Bonds... hide
Select... Chain... A
Actions... Atoms/Bonds... show
Actions... Atoms/Bonds... backbone onlyOnly the A chain's backbone is displayed because the A chain was selected when the action was performed.
| coloring by element |
|---|
 |
To display all the atoms and color them according to element:
Select... Clear SelectionGenerally, each structure opened is treated as a model in Chimera. Models are listed in the left side of the Model Panel (Tools... General Controls... Model Panel). A checkbox in the Active column of the Model Panel shows that the model is activated for motion; unchecking the box makes it impossible to move the model. Checking the box again restores the movable state. Make sure 1zik.pdb is highlighted on the left side of the Model Panel (if not, click on it) and then click close in the list of functions on the right side. Next, use the Close button at the bottom to close the Model Panel.
Actions... Atoms/Bonds... show
Actions... Color... by element
Go on to Part 2 below, OR terminate the Chimera session. A Chimera session may be ended using File... Quit.
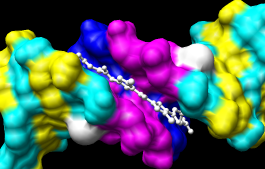
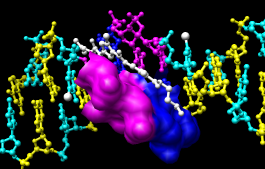
With Chimera started and the Side View opened as described at the beginning of Part 1, choose the menu item File... Open. From the resulting dialog, choose and open the previously downloaded file 6bna.pdb (the File type should be set to all (guess type) or PDB). It contains the molecule netropsin bound to double-helical DNA.
Thicken the lines:
Actions... Atoms/Bonds... wire width... 2
 |
Select... Residue... AAnalogously, color cytosine nucleotides (C residues) cyan, guanine nucleotides (G residues) yellow, and thymine nucleotides (T residues) magenta. Clear the selection by using Select... Clear Selection or picking in a region of the graphics window away from any atoms.
Actions... Color... blue
Rotate, translate, and scale the structure as needed to get a better look (see mouse manipulation to review how this is done). Continue moving and scaling the structure as desired throughout the tutorial. There are still many white atoms, including the netropsin molecule in the minor groove of the DNA and water. Undisplay the water:
- pick one of the white dots (water oxygens; if you cannot see white dots, first change to a stick representation with Actions... Atoms/Bonds... stick)
- hit the up arrow key once to expand the selection to the entire "chain" water (when a PDB file is opened, some residues may be automatically assigned chain ID water); the arrow key only needs to be pressed once because the picked atom is equivalent to an entire residue
- choose Actions... Atoms/Bonds... hide
- choose Select... Clear Selection to ensure that nothing is selected; otherwise, the water will still be selected, even though it is invisible
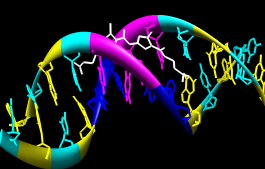 |
Actions... Ribbon... showChange the representation of only one of the DNA strands, chain B:
Actions... Ribbon... round
Actions... Ribbon... hide
Actions... Atoms/Bonds... stick
Actions... Atoms/Bonds... sphere
Select... Chain... BNext, change everything to a ball-and-stick representation:
Actions... Atoms/Bonds... stick
Select... Clear Selection
Actions... Atoms/Bonds... ball & stickIn this representation, pick one of the atoms in the white netropsin molecule. Label the residue,
Actions... Label... residue... name + specifiershowing that it is named NT and is part of chain het (assigned automatically when the structure was read in). The residue label might not be near the selected atom. Remove the residue label:
Actions... Label... residue... offThe first submenu under Label controls individual atom labels, while the second controls residue labels. Actions... Label... name would have shown the name of the atom instead of the name of the residue.
Two white atoms that are not part of netropsin are displayed. They are apparently attached to cytosines, which were previously colored cyan. Pick the two atoms and label their residues,
Actions... Label... residue... name + specifiershowing that one DNA strand is chain A, the other strand is chain B, and each strand contains a brominated cytosine. Use Select... Clear Selection to deselect the atoms, then undisplay the residue labels:
Actions... Label... residue... off
 |
Actions... Surface... showBy default, a surface has the same color as the corresponding atoms; however, surface color can be specified separately. To change the surface color only of netropsin only (which is still selected):
Actions... Surface... hide
Select... Structure... ligand
Actions... Surface... show
Actions... Surface... mesh
Clear the selection, change back to a solid surface, and then undisplay the surface.
- change the coloring target: Actions... Color... surfaces
- Actions... Color... red
- restore the default coloring target: Actions... Color... all of the above
Select... Clear Selection
Actions... Surface... solid
Actions... Surface... hide
 |
To prepare for any subsequent operations, restore the selection mode and clear the selection:
- change the selection mode: Select... Selection Mode... append
- Select... Residue... A
- Select... Residue... T
- change the selection mode: Select... Selection Mode... intersect
- Select... Chain... B
- Actions... Surface... show
Select... Selection Mode... replaceThe command equivalent is much more concise, but requires some knowledge of the atom specification syntax:
Select... Clear Selection
Command: surf :a.b,t.b
Sometimes it is helpful to make a solid surface transparent:
Actions... Surface... transparency... 50%Choose File... Quit from the menu to terminate the Chimera session.