
The Viewing Tool has four sections shown as index cards, Camera, Effects, Rotation and Side View. Only one card is shown at a time, and clicking the tab for another brings it to the front.
|
|
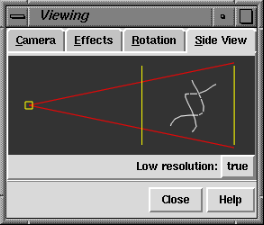
A miniature version of the display shows the relationship between the eye position, the displayed item(s), and the clipping planes. By default, the miniature is shown at full resolution, with colors and representation types the same as the main display. Setting Low resolution to true simplifies the miniature to only the backbone of any peptide and nucleic acid residues shown in the main display. In the low-resolution version, surfaces and objects are indicated by bounding box outlines. Using low resolution is recommended if performance seems slow when large molecules are being viewed.
Dragging the hither clipping plane (the one closer to the eye position) with the middle mouse button moves both clipping planes in the same direction (like using the command section). Dragging the yon clipping plane with the middle mouse button moves the clipping planes in opposite directions (like using the command thickness).
Note that holding the Shift key down will reduce the speed (mouse sensitivity) of manipulations in the main window and Side View by a factor of 10.
The red lines show the field of vision. The use of perspective may be turned off by specifying orthographic projection (see the Camera section). The Side View will then show parallel rather than diverging red lines.
The Camera section of the Viewing Tool describes and allows adjustment of the view shown in the graphics window. It is opened by selecting Settings... Camera from the menu.
The camera mode settings are mono, stereo, stereo left eye, and stereo right eye. Note that stereo will only work when --stereo has been specified at the time of Chimera startup. The projection can be perspective or orthographic. Perspective (the default) causes atoms and bonds further from the viewer to appear smaller, and is indicated in the Side View by red lines diverging from the eye position. An orthographic projection has no scaling-with-distance effect, and is indicated in the Side View by horizontal red lines.
The numerical values are adjustable; a changed numerical value will not be applied until the Enter (return) key has been pressed. The apparent scale of the view depends on both the scale factor and the view radius, which can be changed independently of one another. The apparent scale is directly proportional to the scale factor and inversely proportional to the view radius. The view radius is approximately the distance in angstroms from the center of the view to the closest window border multiplied by the scale factor. Thus if the scale factor is 2 and the view radius is 8, the distance from the center of the view to the nearest window border is about 4 angstroms. The near plane and far plane are the Z-coordinates of the front (hither) and back (yon) clipping planes in angstroms. More positive numbers are closer to the viewer. The focal plane currently has no meaning since all parts of the view are in focus.
The Effects section of the Viewing Tool describes and allows adjustment of visual effects. It is opened by selecting Settings... Effects from the menu. Any changed numerical value will not be applied until the Enter (return) key has been pressed.
Depth cueing is a visual effect in which regions farther from the viewer are dimmer (less intense). The start ratio is how far behind the front clipping plane any decrease in intensity begins, expressed as a fraction of the total thickness between the front and back clipping planes. The intensity decreases linearly from a value of 1.0 at the plane defined by the start ratio to a value of image yon intensity at the back (yon) clipping plane.
The Rotation section of the Viewing Tool describes and allows adjustment of rotation parameters. It is opened by selecting Settings... Rotation from the menu.
The center of rotation method can be fixed, center of models (default), independent, or center of view.