Tom Goddard
April 21, 2017
Will show how to convert 3D light microscopy time series for best performance viewing in ChimeraX, how to record a movie, how to mask extracellular collagen in one channel to regions near a cell seen in another channel (actin).
In past years we did all these tasks in Chimera 1 (classic Chimera) and now I am trying to move it all over to our next generation ChimeraX since all new developments are in that program. Most of what is described below for ChimeraX also works in Chimera 1.
|
|
| First frame of a movie recorded at Eric Betzig's lab of the data showing two views of the data, one along the optical axis which is at 45 degrees to the coverslip, and one perpendicular to the coverslip. |
We'll start with a time series of 3D images in TIFF format in 2 channels:
      cell44_0ch_0000stack_000000msec.tif
      cell44_0ch_0001stack_001383msec.tif
      cell44_0ch_0002stack_002766msec.tif
      ...
      cell44_0ch_0112stack_154878msec.tif
      cell44_1ch_0000stack_000000msec.tif
      cell44_1ch_0001stack_001383msec.tif
      cell44_1ch_0002stack_002766msec.tif
      ...
      cell44_1ch_0112stack_154878msec.tif
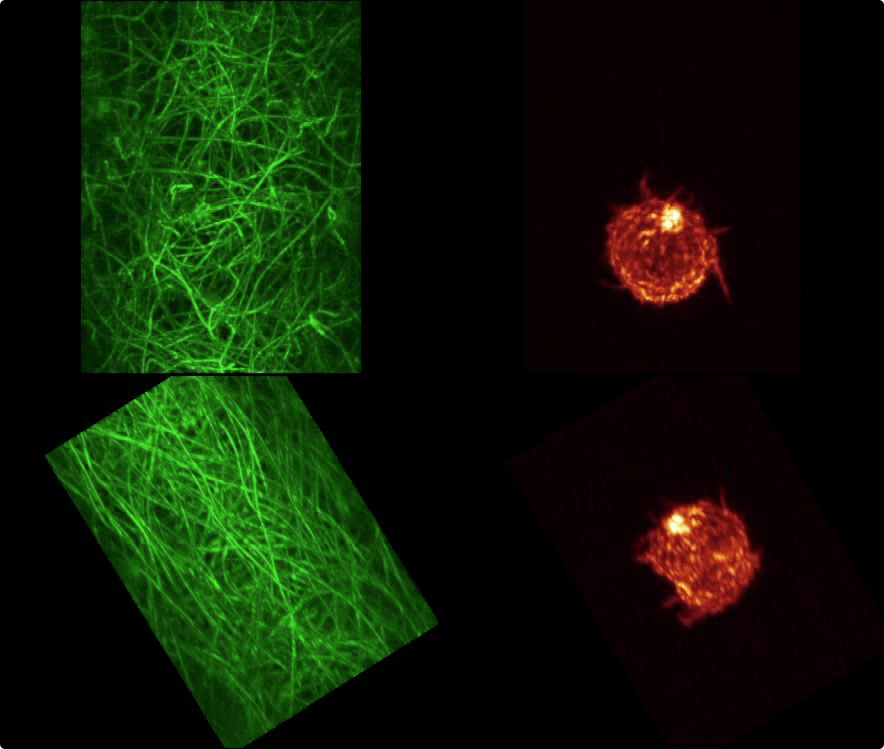
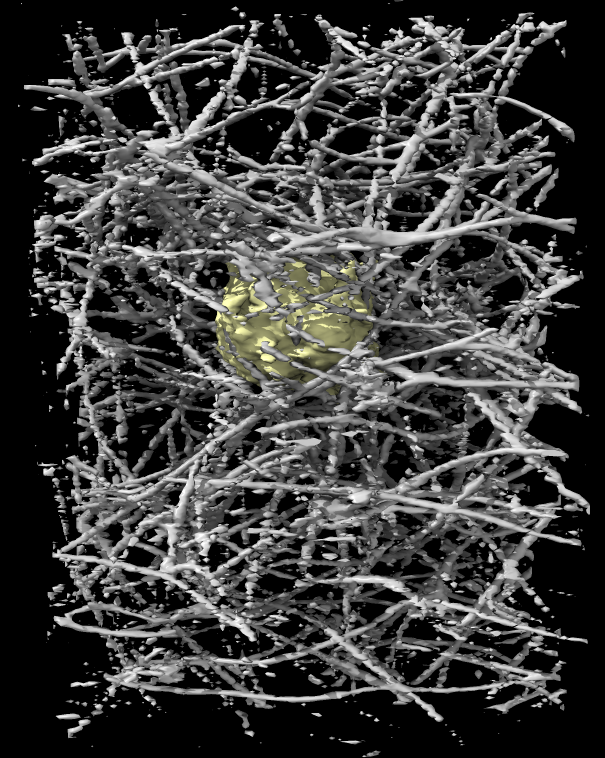
Channel 0 is fluorescently labeled collagen, and channel 1 is actin. There are 113 images (numbered 0 to 112) each 40 Mbytes in size consisting of 256 x 512 by 151 grid points, with voxel size 0.104 x 0.104 x 0.248 microns, recorded on Eric Betzig's lightsheet microscope at Janelia Farm in March 2013.
| 
|
| First time point shown as surface or image in ChimeraX. | |
To open a single time point, both channels, in ChimeraX use command:
      open /tmp/cell44/cell44_0ch_0000stack_000000msec.tif
      open /tmp/cell44/cell44_1ch_0000stack_000000msec.tif
If the file path has spaces in it then you need to put quotes around the entire file path.
Histograms of the data values appear in the volume viewer panel. Set the step value to 1 to show the data at full resolution. Step 2 shows only every other data point along each axis.
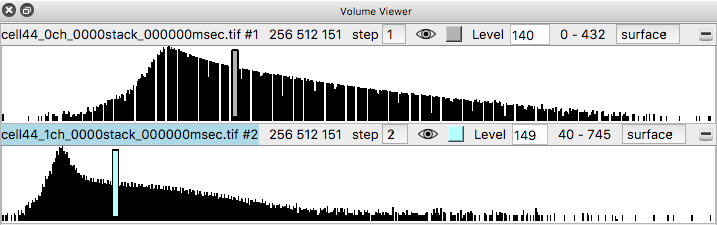
Adjust the surface contour level by moving the vertical bar on the histogram, or changing the numeric value in the Level entry field.
Change from surface to image style with the menu above the histogram, for both channels to show a volumetric (grayscale) style display. Make sure the step sizes are the same for both channels otherwise the two channels will not have their colors blended. If step sizes for the two channels are different it will cause incorrect display where one channel appears drawn on top of the other without proper depth relations.

To get better variation of brightness drag the square nodes on the yellow curve on the histogram. The height of the yellow curve controls the brightness for each image intensity. Lowering the middle part of the yellow curve helps. Also adding another node by right clicking on the yellow path and choosing menu entry New threshold allows making a smoother yellow brightness curve.
To open all time points use the open command with wildcard "*" characters to specify all files. First close the previously opened single time images with the close command. Open each channel with a separate command so each is treated as a time series.
      close
      open /tmp/cell44/cell44_0ch_*.tif
      open /tmp/cell44/cell44_1ch_*.tif
This takes a minute because it is reading the header of every TIFF image. We'll remedy this later.

A time slider appears that allows showing different time points. The play button will step through the times. At step 2 this is pretty slow to load the data, about 1 time point per second, because the TIFF format is slow to read. The 1/2 button to the right of the slider toggles the maps between step 2 and step 1.
There is currently a bug where the time slider will sometimes show a time different from the one being displayed. The volume viewer panel shows the name of the actual time being displayed. This bug will be fixed in the near future.
The TIFF image files don't contain the voxel size (in microns) and the xy and z sizes are different so the 3d image will appear squished in z because ChimeraX assumes the voxel size is 1 by 1 by 1 if not given. I got the voxel size by opening the deconvolved Amira map files (described below) which include it in the file header -- and it is reported in the ChimeraX log panel. To set the voxel size use command
volume #1,2 voxelSize 0.104,0.104,0.248
To move through the time series more quickly we convert to a file format that is faster to read, Chimera map format (suffix .cmap) based on the HDF5 file format. It will save multiple resolution copies of the entire time series for one channel in a single file.
      vseries save #1 /tmp/cell44/cell44_ch0.cmap
      vseries save #2 /tmp/cell44/cell44_ch1.cmap
This takes a long time, maybe 30 minutes because reading and writing the large data is slow. It will be faster with a solid state disk drive (SSD). After saving in Chimera map format you can open those files and play through the time series.
      close
      open /tmp/cell44/cell44_ch0.cmap
      open /tmp/cell44/cell44_ch1.cmap
It should be much faster to play through the .cmap time series files but I get about 1 time per second at step 2 which is about the same as I get with the original TIFF files. Something is wrong and requires further investigation because it should be reading much less data with Chimera map format since the file contains a step 2 copy. I'd expect to get 100 Mbytes per second of a spinning disk, and at step 2 it is 8x less data, and the data for 2 channels at one time is about 80 Mbytes, so a single time at step 2 is about 10 Mbytes, and I'd expect data to be read at 10 time points per second.
A couple factors also effect playback speed. Once ChimeraX has read the data in it caches it in memory up to some memory limit controlled by the volume command dataCacheSize option (default 512 Mbytes). As ChimeraX plays through the time series it does not keep the data in memory if it exceeds the cache size (least recently used data is purged). Also the operating system caches files that have been recently read in memory, greatly increasing read speed (when testing the Mac OS purge command clears the disk cache).
On my machine which has 32 Gbytes of memory I can set the ChimeraX cache size to 16 Gbytes using command
volume dataCacheSize 16000
The above TIFF files were the original images from the microscope. Deconvolution to undo the smearing of point spread function sharpens the map allowing finer features to be seen. The deconvolution code used on this data by Eric Betzig's lab produced Amira files. We load and convert these just like the TIFF images.
Deconvolved data files in subdirectory cell44/g for channel 0 and cell44/r for channel1:
      cell44_0ch_0000stack_000000msec.tif.deconv.am
      cell44_0ch_0001stack_001383msec.tif.deconv.am
      cell44_0ch_0002stack_002766msec.tif.deconv.am
      ...
Commands to open and convert deconvolved images to Chimera map format:
      close
      open /tmp/cell44/g/cell44_0ch_*.am
      vseries save #1 /tmp/cell44/cell44_ch0_decon.cmap
      open /tmp/cell44/r/cell44_1ch_*.am
      vseries save #2 /tmp/cell44/cell44_ch1_decon.cmap
With surface rendering there are different lighting modes. The default has ambient shadows (shadowing of light from all directions) and a direct light shadow, and is called full lighting. It can make dense interior structures dark and it can slow down playing the time series because the shadows are recomputed when the surface shapes change. The simple lighting mode uses no shadows. Another lighting mode called soft has ambient shadows but no direct shadow. The following toolbar icons or commands control the lighting mode.


      light full
      light simple
      light soft
The deconvolution algorithm rescaled every time point so the values lie exactly from 0 to 4095 (12-bits). So every time point got a different scaling based on the outlier data values. This makes playback of the data flicker in brightness. This mistake in data processing was supposedly fixed sometime after this data was acquired. To fix the scaling of this data we can rescale the deconvolved data so by comparing it to the original TIFF data. We choose a shift and scale to minimize the sum of the squares of the differences summed over all grid points for each time. Here is the command that writes the rescaled data:
      close
      open /tmp/cell44/g/cell44_ch0_decon.cmap
      open /tmp/cell44/g/cell44_ch0.cmap
      vseries save #1 /tmp/cell44/cell44_ch0_decon_rescale.cmap matchScale #2
      open /tmp/cell44/g/cell44_ch1_decon.cmap
      open /tmp/cell44/g/cell44_ch1.cmap
      vseries save #3 /tmp/cell44/cell44_ch1_decon_rescale.cmap matchScale #4
The rescaled series does not flicker during playback and is the one to use for further analysis.
To play back the series using a command instead of the time slider use
      close
      open /tmp/cell44/g/cell44_ch0_decon_rescale.cmap
      open /tmp/cell44/g/cell44_ch1_decon_rescale.cmap
      vseries play #1,2
To record this as a movie use
movie record ; vseries play #1,2 ; wait 113 ; movie encode ~/Desktop/cell44.mp4
This is 4 commands on one line separated by semi-colons. The movie record command starts saving image files for every frame rendered. The vseries command plays the 113 frames. The wait command waits for 113 frames to be drawn. This is needed because the vseries command completes immediately without drawing any frames. The movie encode command saves the image files for each frame into an H.264 encoded video. The movie is recorded using the size of the currently display ChimeraX graphics window. Movie.
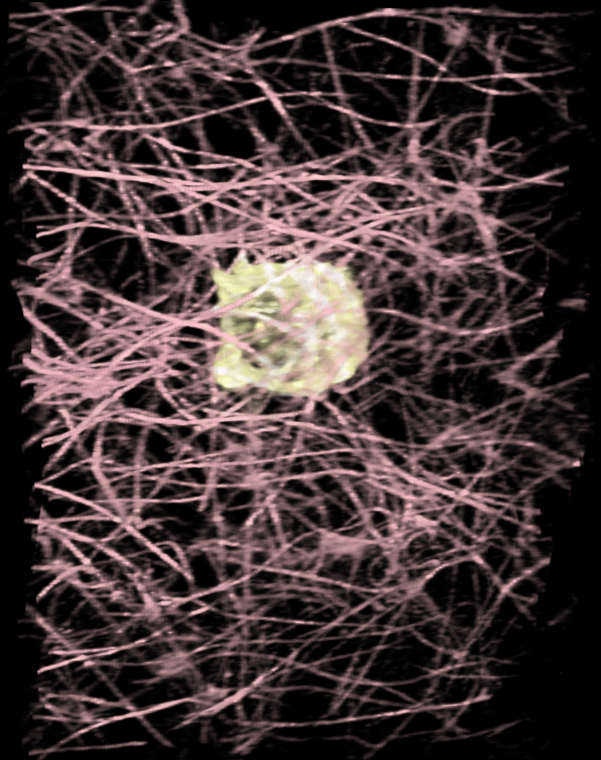
I changed the color of the collagen to pink with the command, step 1, image style with
volume #2 color pink step 1 style solid
To show a specific time point using a command instead of the time slider, for example to jump to time point 50 (out of 0 to 112):
vser play #1,2 jump 50

You can hide or show a channel using the checkbuttons in the Models panel (under the S for "Shown" column). The color buttons in the model panel can also change the channel colors.
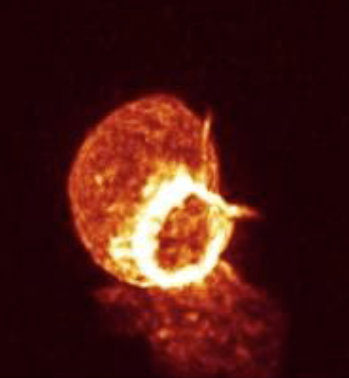
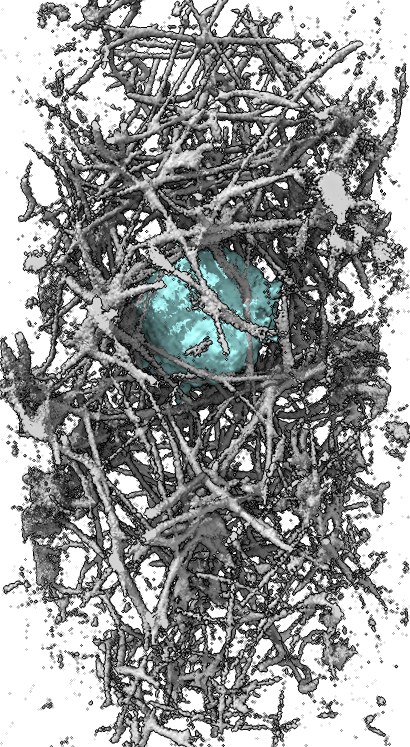
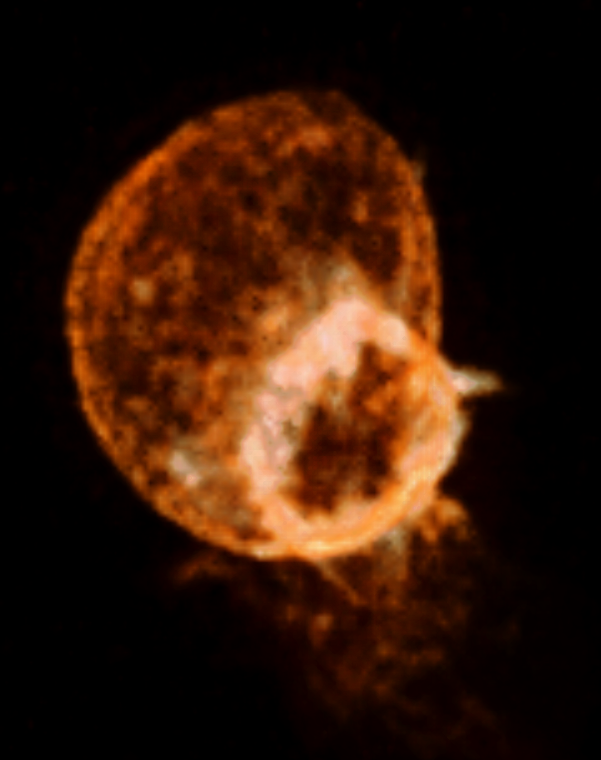
This cell forms actin rings that are nicely highlighted in the Amira movie shown above shows actin rings as bright white forming in the red cell. It requires a few tricks to make that kind of nice display in ChimeraX. The main effect that makes the Amira image look good is that the red color saturates to white in the bright ring. ChimeraX by default does not saturate the red, green, blue color channels so the shade of color will not change in bright regions. But you can choose different colors along the yellow line in the histogram that gives the brightness. Add a 4th node to the yellow curve by right click and choosing menu entry New threshold. Then change the color of the lower two threshold squares to orange by clicking on the square on the yellow line, then clicking the color button above the histogram and choosing the color, then repeat to make the second lowest square orange, and the highest intensity two squares white. This can also be done with a command:
volume #2 level 50,0 color orangered level 250,0.85 color orangered level 670,1 color white level 1400,1 color white
ChimeraX without max intensity projection (left) and with it (right) and white color at high intensity.

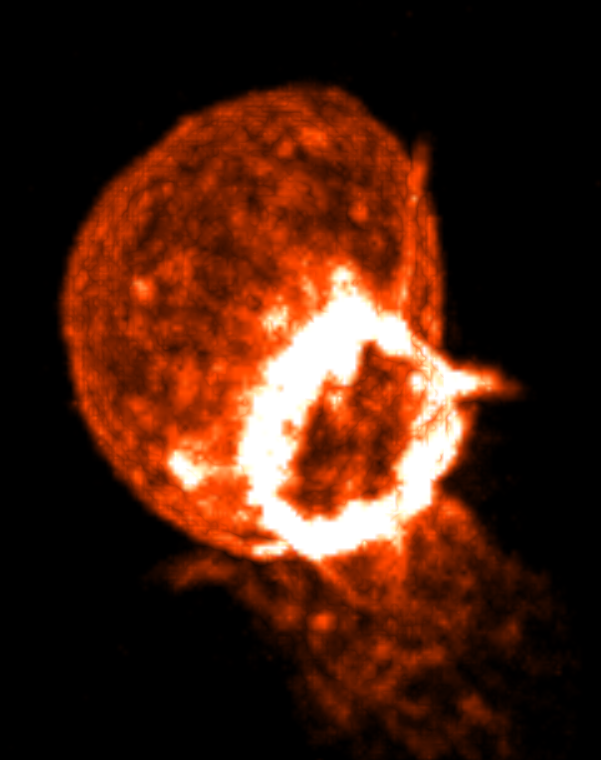
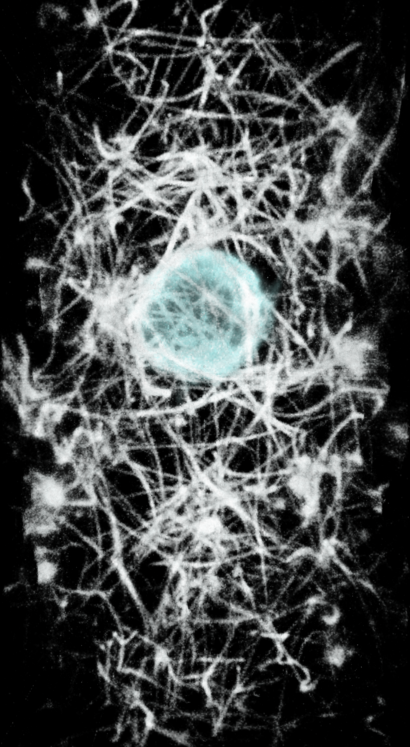
To make the ring even brighter enable maximum intensity projection.
volume #2 maxIntensityProjection true
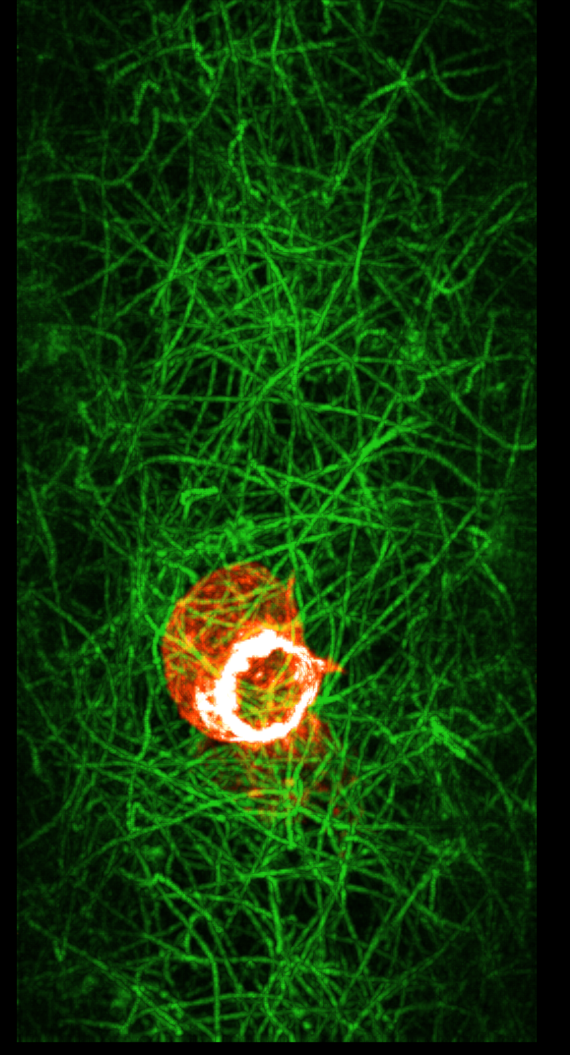
| 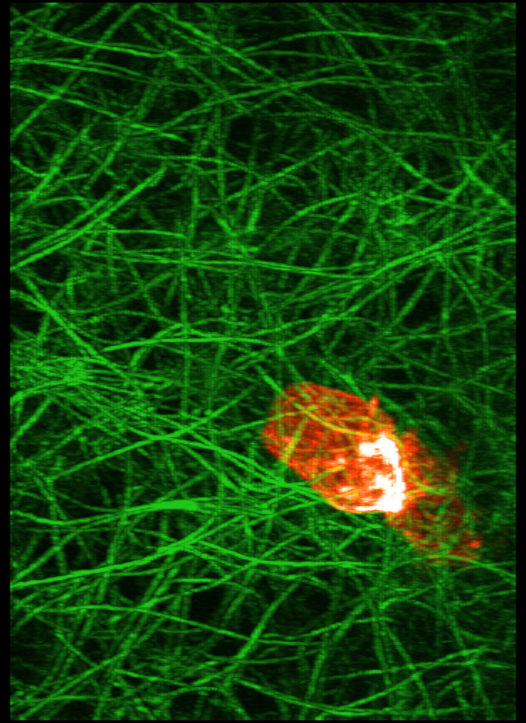
|
| Max intensity projection movies rotated 90 degrees about y axis relative to one another. Left movie. Right movie. | |
The ring in the image is at the back of the cell and is seen through material in front and hence dimmed. But with maximum intensity projection the material in front does not dim the material in back -- only the brightest spot beneath a pixel is drawn. This eliminates any depth cues but can highlight features. It is off by default in ChimeraX. Enabling this also requires changing the brightness curve to get best appearance.
Using the same movie recording command as above we can record a maximum intensity projection movie.
This movie was recorded with orthographic camera instead of the default perspective camera so objects in back are as wide as objects in front (no perspective). Different view directions can be obtained using the turn command, for instance rotate 180 degrees about the x axis to get the Amira view.
      camera ortho
      view orient true
      turn x 180
To get a clearer view of if the actin ring formation is related to contacting collagen it will be useful to show only the collagen with say 5-10 microns of the cell. Also we can use view directions perpendicular to the ring and extract a box around the ring aligned with the ring to get the best possible view of the collagen interactions. The masking can be done now in ChimeraX as we did it in Chimera in the past, although I want to make a better version that uses a precise distance range from the cell. Extracting a box aligned with the ring will take hand positioning of the box which Chimera 1 has but ChimeraX does not. I plan to add that to ChimeraX soon. Surface renderings might provide a better view of the actin collagen interactions.