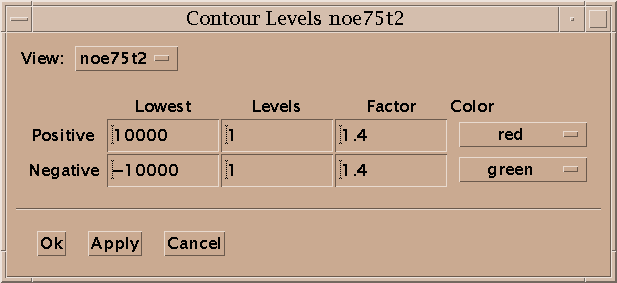
Contour levels for a view are set with the contour dialog (ct). For the positive levels you set the lowest level, the number of levels, the scale factor from one level to the next, and the color. The level heights increase geometrically. The scale factor is multiplied times the lowest level to get the next higher level. Negative levels also have a lowest level (a negative value), number of levels, scale factor and color. The number of levels can be zero. Some of the color choices such as red-blue, red-yellow and green-blue color the contour lines in a range of colors according to their height. In the red-blue scheme the lowest contour level is red and the highest level is blue with intermediate levels having intermediate colors. This can help you see peaks when looking at highly overlapped regions that are a mass of contours, or when you wish to have low contour levels that show alot of noise.
You can display a scale showing contour levels at the edge of a contour plot using the command vC. The levels can be adjusted by dragging the lowest or highest level up or down with the mouse. This keeps the existing levels (their position and spacing) fixed while adding or removing levels at the low or high end. By dragging up or down starting in the middle of the group of levels you can add or remove extra levels while keeping the lowest and highest level fixed. This changes the positions and spacing of all the intermediate levels.
In the "center" pointer mode a view is recentered to any point you click on.
The view center command vc centers the view on the selected peak. The most useful case is when the selected peak is from another spectrum. If the peak spectrum and the view spectrum are different then it is possible that only some of the view axes will be centered. For example, if the peak is from a 2D HSQC spectrum (15N and 1H axes) and the view is an HNCA spectrum (1H, 15N, 13C axes) then only the proton and nitrogen axes of the view are adjusted. The carbon axis is left in the current position. The exact rule is for each view axis center use the unique peak axis with matching nucleus type. If there is more than one peak axis with matching nucleus then center the wN view axis with the wN peak axis if the nucleus types match. In other cases don't center the view axis. The true peak frequency (including any peak alias) is used. If the resulting center position is off of the view spectrum then multiples of the spectral width are added or subtracted to bring it onto the spectrum.
When you are working with many views the screen gets crowded. To hide views use "view hide" (vh). To bring them back select them by name from the View menu. You can also use the View menu to raise views that are buried behind other windows to the surface. Another way to show hidden views is to use the project view list (pv). You can also iconify views by clicking on the "iconify" button on the window frame next to the "maximize" button in the upper right corner.
To zoom in or out by a factor of 2 use the zi and zo commands. To show the full spectrum use "zoom full" (zf). To step downfield or upfield one plane along the z azis in a 3D spectrum use zd and zu. When you zoom to a new region with these commands or using the mouse in zoom mode or recenter a view on a peak, the previous region being viewed is remembered. Up to 16 previous positions are remembered. You can go to the previous position with "zoom previous" (zp). After going back to previous regions with zp you can return with "zoom next" (zn). Because it is common to make many small moves with the scrollbars, a region is not remembered when you scroll somewhere else. This is to avoid cluttering up the history of previous regions. If you want to scroll away from a region of interest and later come back to it with zp, use the "zoom remember" command zr. This puts the current region in the list of previous regions. To name specific regions so that you can zoom to them by name use the region dialog (rt). You can type numerical ppm ranges to this dialog and associate a two letter accelerator with them. You then use the "region goto" (rg) command followed by your chosen 2 letter region abbreviation to zoom to that region in any spectrum.
The region dialog (rt) allows you to name regions with given chemical shift boundaries so that you can quickly zoom to those regions. To name a region enter the numerical region limits in ppm. You can instead adjust a view so it is showing the desired region and press the Current button to have the boundaries entered for you. Type in a name and a two letter accelerator. The accelerator names do not conflict with Sparky commands so you can choose any two letters. Press the Add button to add the named region to the list of regions. Now you can use the region goto command rg followed by the two letter region accelerator to zoom a view to this region.
You can also apply the current pointer mode to a region. For example, to pick peaks over an entire spectrum choose the find/add peaks pointer mode (F8). Bring up the region dialog (rt). It will show the upfield and downfield limits of the region you are viewing. Press the World button. This sets the limits to include the whole spectrum. Now press Apply Mode to find peaks.
The orthogonal views (ov) command shows three orthogonal planes of a 3-D spectrum. If a peak is selected before typing the command, the three orthogonal planes intersect at the peak position. Otherwise they intersect at the central point of the current view. The three views have their w1, w2 and w3 axes synchronized. This means the center points of the 3 views show the same data point even when you scroll one view or center on a new peak.
You can overlay the contours of one spectrum on another spectrum. You use the overlay dialog (accelerator ol) to set this up. You choose two Sparky views, one to to be shown overlaid on the other. By repeating this process you can overlay as many spectra as you want on one view. You can control the contour levels and colors of each overlaid view separately using the contour dialog (accelerator ct). Printed output does not include the overlaid contours.
You can print contour plots to a Postscript printer with command pt. Only postscript output is available. Color output is supported. Use the Save button to save the postscript to a file. The Preview button is available only on systems that have a postscript previewer. The path to the previewer program must be set in the bin/sparky startup script.
The renumber view command rv renames the selected view to use the lowest available suffix number. When more than one view window is created for a spectrum the views are given unique names by appending "/1", "/2", "/3".... After deleting some of these windows you can renumber a view to use the lowest available number. If the spectrum name without a number suffix is not in use, that name will be chosen.
The selected view is the window that you last clicked on or moved the pointer into. Whether you need to click on a window or just move the pointer over it to select it is determined by your window manager, not Sparky. Most window managers allow you to choose either style. The selected view has the word "selected" in its title. when you execute a command from the pulldown menus it operates on the selected view.
The spectrum settings dialog (st) allows you to adjust ppm references, change sweepwidths, change the molecule and experimental condition, and recompute the estimated noise level for a spectrum.
You can shift the ppm scale for each spectrum to align spectra. Use the spectrum dialog (accelerator st). The ppm positions of all peaks are updated.
The spectrum settings dialog (st) lets you adjust the estimated noise level. This value is used in peak lists when data height is shown as a signal/noise ratio. By default it is estimated as the median of 30 randomly sampled absolute value data heights. You can reestimate the value by specifying how many data points to sample and pressing the Recompute button. The new noise estimate will be displayed. This does not become the new noise value for the spectrum unless you press Ok or Apply. Taking 1000 samples gives a noise estimate that will vary by about 3% with different samples. Estimating with more samples can take alot of time because typically only a small portion of a spectrum is kept in memory and most data points will be accessed from the hard disk.
Specify the molecule and condition for a spectrum using the spectrum dialog (st). A given molecule and condition has a set of resonances associated with it. The resonance positions are calculated by averaging the positions of assigned peaks in all spectra for that molecule and condition. The molecule and condition are only used to name multiple sets of resonances. They can be changed at any time and all resonance lines are automatically recalculated.
The molecule and condition can be any text. They can include spaces and they may be left blank. The condition is meant to include things like temperature and ph (eg "25C ph7"). It is desirable to keep the names short since they are sometimes displayed in the titles of windows and in menus.
You can rename a spectrum and its view windows. The name appears in the spectrum and view menus and on the window frames. Names can contain any characters including spaces. The default name for a spectrum and its view windows is the file name of the NMR data. If a spectrum name is already in use a suffix like ":1", ":2", ... will be appended.
Sparky uses the sweepwidth for each axis of a spectrum to properly handle aliased peaks and resonances. The sweepwidth is used by the peak aliasing commands, resonance panels, and assignment guessing. Usually the sweepwidth along an axis is the full width of the spectrum. But if the nmr data file represents only a subregion of the full spectrum, the sweepwidth will be greater than the width of the spectrum. By default, Sparky assumes the sweepwidth is equal to the spectrum width. To change the sweepwidth use the spectrum settings dialog (accelerator st).
Axes of 2 or more views can be synchronized so that scrolling one view causes the others to scroll. Accelerator yt. Synchronization keeps the center positions (in ppm) of the corresponding axes the same. To make synchronized views match their displayed ranges use "synchronize ranges" (yr).
The accelerators ya, yd, and yt all bring up the synchronization dialog. It lists the axes for every view. You select two or more axes to synchronize and press the synchronize button. Synchronized axes have a letter a, b, c... appearing next to them. Axes labelled with the same letter are synchronized. To remove synchronizations select one or more axes you no longer want to synchronize and press the unsynchronize button. Synchronization keeps the center positions of the synchronized axes matching. Note that you can synchronize two axes from the same spectrum. This forces the view to show the diagonal and is probably not what you want. To make synchronized views display the same range along synchronized axes use synchronize ranges (yr). This will zoom other views to show equal axes ranges. They are matched to the view in which you executed the synchronize reset command (ie. typed yr).
To zoom a view to the corresponding region across the diagonal of a homonuclear spectrum use "transpose axes" (xx). If you try xx on a heteronuclear spectrum the displayed vertical and horizontal axes are swapped keeping the center of the view fixed.
To cyclically permute the axes of a view of a 3-d spectrum use "axis roll" (xr). The center point of the view is kept fixed. On a 2-d spectrum this command swaps the axes.
The "project view list" (pv) shows a list of all your view windows. The project view list shows the sizes, nuclei, number of peaks, and number of assignments for your spectra. A minus sign is shown next to hidden views and a plus sign next to visible views. Double click on list entries to show a hidden view or to hide a shown view. Select one or more lines and press the Hide button to hide or the Show button to show the chosen views.
Use the "view settings" dialog (vt) to change what is displayed in a spectrum view window. You can control the display of axis scales (vs), axis units (xp, xh, xd), nucleus types (xa), aspect ratio, assignment label format, ornament display (os, ls, ps, xs, gs, is), resonances along edges (vR), 1-D cross-sections along edges (vS), peak info status bar (vp), crosshair display (hh, ht, ho), scrollbars (vb), and subtracting fit peaks (sf).
The scales along the edges of views can display ppm units, index units (ie. indices from the NMR data matrix), or Hz using accelerators xp, xd, xh. You can display the nucleus types (H, 13C, 15N) on the scales using "axis atoms" (xa).
The aspect ratio controls how a 1 ppm by 1 ppm cell will appear on the screen. An aspect ration of 3 would make the 1 ppm square appear 3 times wider than it is tall. Aspect ratios less than one make the cell appear taller than it is wide.
The assignment format specifies how to display assignment labels on contoured spectra. The default format is "%a1-%a2" for a 2-D spectrum. The "%a1" means display the full atom name for the w1 assignment. The full atom name includes the group. Then the "-" is just put into the label. Then "%a2" means display the atom name for the w2 assignment. The "%a2" will not display the group if it is the same as the group displayed in the preceding "%a1" part. To force the groups to be displayed use "%A1-%A2". In general, "%a" means display the atom name and leave off the group name if the preceding % format displayed the group, whereas "%A" means always show the full atom name. To show just the group names use "%G1-%G2". To show just the group name for the w2 axis use "%G2".
Views can display a crosshair (vertical and horizontal lines) that follows the pointer. They can also display a crosshair transposed across the diagonal in homonuclear spectra. They can also display a crosshair when the pointer is in another view at the corresponding point in this view. This last capability helps look at corresponding peaks in different spectra. To turn on crosshairs of one type or another use the view settings dialog (vt).
Crosshair tracking from other views shows the crosshair in one view at the corresponding point in another view. What does the "the corresponding point" mean? It means the same ppm values on the w1, w2, w3, ... axes. But if the two spectra don't have matching nucleus types (1H, 13C, 15N) Sparky will make the axis correspondence that makes nucleus types match provided there is a unique correspondence. If there isn't a unique correspondence Sparky chooses one of the possible correspondences based on rules that are beyond explanation.
The switches in the view settings dialog (vt) or the accelerators os, ls, ps, xs, gs, is, turn on and off display of ornaments, labels, peaks, peak groups, grids, and lines. The ornament display switch (os) turns off the display of all ornaments when it is off. When it is on the specific ornaments selected with the other switches are shown.
The "show peak info" command (vp) puts a status bar at the bottom of the current view which displays peak assignment, position, height and linewidth when the pointer is over a peak. If the peak has been integrated by fitting then the fit height and linewidth are shown. Otherwise an estimated linewidth is computed by finding the position at which half the peak height is reached on either side of the peak. Twice the minimum of these distances is shown as the linewidth. If the peak is not positioned at the local maximum the linewidth can be misleading. When the pointer is not over a peak marker but is over a contoured region Sparky will find the local maximum and show its position, height and estimated linewidth.
Use "show resonances" (vR) to display resonances along the edges of spectrum views. The resonance closest to the pointer position is highlighted in blue. If the pointer is over a peak, the assigned resonances are highlighted in red. The resonances often get very crowded making the display along the edges not useful. You can reduce the number of resonances displayed by setting assignment guessing constraints. Press the Guessing button in the assignment dialog (at) to set assignment constraints. For example you can set an (i,i) constraint meaning consider only intra-residue assignments. Then switch on "Thin resonance panels using assignment guessing?" in the preferences dialog (pf). Now a resonance from residue 17 will only be displayed along the x-axis if there is some resonance from residue 17 in the range displayed on the y-axis.
Accelerator vS turns on and off the display of 1-D data cross-sections. The 1-D profiles are displayed along the edges of the spectrum view window. The panel along the bottom edge shows the horizontal data slice passing through the current pointer position. With crosshair display turned on the horizontal crosshair line shows the position of this 1-D section. The panel at the right edge of the view shows the vertical 1-D slice passing through the pointer position. If peaks have been integrated by fitting Gaussians or Lorentzians, the fit profile is shown in the slice panels in blue. The fit profile for selected peaks only is shown in cyan. An additional trace (in green) can show the spectrum data minus the fit peak curve (sf). This is useful for judging the quality of peaks with baseline fitting.
You can adjust the range displayed in the 1-D data profiles shown at the edge of contour plots (accelerator vS). You move the mouse to either the horizontal or vertical slice panel and drag to adjust the range displayed. Holding the shift key while dragging shifts the center line. Alternatively you can have the range automatically adjust to fit the slice data. Set this in the view settings dialog (vt).
A problem with adjusting the slice panels is that when you move the pointer to the slice panel it updates the slices. So you no longer see the relevant slice you want to use to adjust the scales. Here is a way adjust while showing the slice you are interested in. Suppose you want to look at an X axis slice. Move the pointer horizontally to the Y axis slice panel and adjust the scales. Since both X and Y slice panels use the same range you will see the effect on the X slice. Try it and you'll understand what I mean.
Turn on the subtract fit peaks (vf) switch to display contoured data with fit peaks subtracted off. This can be used in conjunction with 1-D slice display to see how well the spectrum data is fit and to see whether there are smaller peaks buried under larger fit peaks.
View windows can contain 3 and 4 dimensional spectra but only a 2D contour plot is shown. One or two sliders are placed at the bottom of the view window to select different 2D planes for viewing. The view depth command vz controls how far a picked peak can be from the currently displayed plane and still be shown. By default picked peaks are shown if they are within half an index unit of the displayed plane. Index units represent the indices into the data matrix and so one index unit corresponds the distance between neighboring planes (ie the separation in ppm or hertz of adjacent planes). Picked peaks have their positions interpolated, so they need not lie exactly in one of the data planes. The view depth command vz shows a dialog where you can specifiy how far away a peak marker can be from the displayed plane and still be shown. If you specify 4 extra planes, then peaks from the 2 planes above and 2 planes below the displayed one will appear. Strictly speaking, with 4 extra visible planes, all peaks within (4 + 1) / 2 = 2.5 index units of the currently displayed plane are shown.