The Viewing Tool
The Viewing Tool has five tabbed sections, also listed separately
as Chimera tools:
Clicking the tab for a section brings it to the front.
For the front section only,
Reset replaces the current settings with the original
“factory” defaults,
Restore replaces the current settings with those previously saved in the
preferences file,
and Save saves the current settings to the
preferences file.
Close dismisses the Viewing Tool, and Help opens
this manual page in a browser window.
The Camera section of the Viewing Tool
controls several aspects of the view, including stereo parameters.
There are several ways to start
Camera, a tool in the Viewing Controls category.
Default settings are indicated in bold.
See also: stereo,
set
- camera mode - refers to any of several stereo and mono
viewing options (details...):
- mono (default, not in stereo)
- stereo left eye
- stereo right eye
- cross-eye stereo
- wall-eye stereo
- red-cyan stereo
- overlapping left-eye and right-eye views in different colors,
to be viewed with “glasses” (often inexpensive cardboard/plastic)
with colored filters
- green-magenta stereo
- similar to red-cyan, but with different colors and trade-offs
- sequential stereo
- rapid flickering between left-eye and right-eye views, to be viewed
with special synchronised glasses. Sequential stereo is
not always available.
- reverse sequential stereo
- as above, but with the opposite convention for the two views
- row stereo, right eye even
- row-interleaved with even rows used for the right-eye view
- row stereo, right eye odd
- row-interleaved with odd rows used for the right-eye view
- dome
- angular fisheye of the hemisphere in front of the camera,
with horizontal field of view locked to 90°
- truncated dome
- same as the dome mode, except with the bottom of the hemisphere cut off
- DTI side-by-side stereo
- projection
(perspective/orthographic)
- perspective makes farther-away objects smaller, and is
indicated in the Side View by red lines
diverging from the eye position. An orthographic
projection has no scaling-with-distance effect, and is indicated
in the Side View by horizontal red lines.
- scale factor (1 when a structure is first opened) -
a factor reflecting the cumulative effects of scaling with
the mouse, the Side View, and/or the command
scale
- near plane - Z-coordinate of the front
global clipping plane
- far plane - Z-coordinate of the back
global clipping plane
- horizontal field of view
(allowed range 1.0-179.0°)
- controls how much of the scene is visible within the graphics window;
a smaller value zooms in on a smaller portion of the scene.
The vertical field of view will change along with the horizontal field
of view according to the aspect ratio of the graphics window.
- Stereo parameters
- units (millimeters/centimeters/inches)
- units for the following stereo parameters
- eye separation (default 2.0 inches)
- effective distance between the left and right eyes
- distance to screen - effective distance from the viewer to the
screen (or focal plane,
even though items out of this plane do not appear “out of focus”).
When viewed in stereo, items in front of the focal plane will
appear to project from the screen, and items behind the plane will
appear to recede behind the screen.
- screen width - physical width of the entire screen (not just
the graphics window). The value is initially what is
reported by the windowing system, but it can be edited.
Changing the value does not resize the graphics window.
The eye separation and distance to screen
govern the parallax between the left- and right-eye views.
The horizontal field of view, distance to screen, and
screen width are interdependent. The graphics window width
is determined from the screen width and the known pixel dimensions
of the screen and graphics window. For a given graphics window width, the
horizontal field of view and distance to screen are inversely
related; changing one changes only the other, in the opposite direction.
Changing the screen width value or resizing the graphics window
(widthwise) changes only the distance to screen, in the same direction.
The horizontal field of view, eye separation, and
position of the focal plane relative to the items in view can be
changed interactively using the Top View.
The Effects section of the
Viewing Tool
controls visual effects such as depth cueing.
There are several ways to start
Effects, a tool in the Viewing Controls category.
Default settings are indicated in bold.
See also: set,
background,
preset
- depth cueing (on by default)
refers to front-to-back shading with the
depth-cueing color.
The shading increases linearly from start to end.
- start (default 0.5) - where depth-cueing starts,
relative to the front (0.0) and back (1.0)
global clipping planes;
values outside the 0-1 range are allowed
- end (default 1.0)
- where depth-cueing attains full strength,
relative to the front (0.0) and back (1.0)
global clipping planes;
values outside the 0-1 range are allowed
- color
(a color well,
No Color by default)
- the color used for front-to-back shading (depth cueing).
When set to No Color, the shading color will be the same as the
background color.
- silhouettes (off by default)
- show outlines to emphasize borders and discontinuities.
This setting is global (applies to all models),
but when it is on, silhouettes can be toggled for individual models
with the command setattr,
the Selection Inspector,
or the molecule model attributes panel.
- color (a color well,
default No Color, equivalent to black)
- width (default 2.0) - linewidth
- shadows (off by default)
- display interactive shadows
- quality - a tradeoff between the smoothness of shadow borders
and computational demands; simply trying the settings is
recommended to determine which works best for a given system:
| quality setting | graphics card memory
usage (MBytes) |
2D texture size |
| coarse |
4 | 1024 |
normal
(default) |
16 | 2048 |
| fine |
64 | 4096 |
| finer |
256 | 8192 |
- transparency:
- single-layer (on by default)
- render only the topmost layer of all transparent items.
Showing only the topmost layer rather than all transparent layers simplifies
the display and is recommended for de-emphasizing transparent parts.
- flat (off by default)
- make apparent transparency independent of the viewing angle.
Otherwise, transparent triangles (forming objects as well as surfaces) will
appear more opaque when viewed edged-on than when viewed face-on.
- graphics quality:
- subdivision
(default 1.5, maximum 20.0)
- the stick, ball-and-stick, sphere, and ribbon
representations
consist of curved surfaces approximated by collections of planes;
increasing the subdivision level increases the number of planes
and the apparent smoothness. This setting also affects
curved geometric objects defined in BILD format,
but not molecular surfaces.
Display presets
adjust the subdivision level to 1.5 (interactive) or 5.0 (publication).
- multisample (off by default)
- whether to use OpenGL multisampling, i.e.,
multiple samples per pixel so that edges are antialiased.
If not well supported by the system, rendering with this option
can be very slow or reveal graphics driver bugs.
Multisampling can also be enabled with the
startup option --multisample.
The Rotation section of the
Viewing Tool controls rotation behavior.
There are several ways to start
Rotation, a tool in the Movement category.
See also: cofr,
focus,
set independent,
Mouse preferences,
Set Pivot and the
Focus action in the
Actions menu
- center of rotation method:
- fixed - at a fixed point relative to the model(s),
see rotation center
- center of models
- at the center of the bounding sphere of the displayed parts of
active models
- independent - a separate center for each model
rather than a single collective center
- center of view - continually adjusted
to the current center of view (in the middle of the window,
halfway between the front and back
global clipping planes)
- front center (default) - when the view is zoomed out,
behaves like center of models;
when the view is zoomed in on parts of items,
behaves like center of view, except the center of rotation
depth (Z-coordinate) is set to that of the frontmost displayed
unclipped atom whose VDW sphere intercepts a line perpendicular to the
screen in the window center.
The center is not updated when only rotations are performed.
- rotation center (X, Y, and Z coordinates
in the laboratory frame of reference)
- editable only when the center of rotation method is fixed,
meaningless when models are set to rotate independently
The center of rotation can be shown with “+” crosshairs
in the graphics window
with the command set showCofR.
The Side View section of the
Viewing Tool provides a convenient and intuitive way to scale
the view and to control clipping.
There are several ways to start
the Side View, a tool in the Viewing Controls category.
- The yellow square on the left represents the viewer's eye position.
Dragging it horizontally with the left mouse button adjusts the
scale factor.
This does not change the stereo parameter
distance to screen.
Double-clicking the eye position brings up a menu for changing the
camera mode.
- The vertical yellow lines represent the front and back
(hither and yon)
global clipping planes.
Each can be dragged with the left mouse button.
Dragging the hither plane with the middle or right mouse button
moves both clipping planes in the same direction, while dragging
the yon plane with the middle or right mouse button
moves the clipping planes in opposite directions.
- The red lines emanating from the eye position show the field of vision.
The lines diverge when perspective is used,
but are parallel in the orthographic projection.
Simultaneously holding down the Shift key reduces the speed
(mouse sensitivity) of dragging operations by a factor of 10.
The Clip checkbox indicates global
clipping status (on or off). Surface capping... brings up the
Surface
Capping dialog for controlling the appearance of planar
caps where surfaces are sliced away.
Clicking
View All turns off global clipping
and adjusts the scale to include everything that is displayed.
Model rotations and translations are not adjusted.
The default Side is right: it shows the relationship
between the viewer and the Chimera scene from the viewer's right side.
Setting View to top switches to a
top view in which
stereo parameters and perspective can be adjusted interactively.
The Lighting section of the
Viewing Tool
allows lighting parameters to be changed and saved.
There are several ways to start
Lighting, a tool in the Viewing Controls category.
See also: lighting,
lighting details
Lighting includes two parts:
The buttons along the bottom of the dialog
(Reset, etc. as described above)
apply to both parts even though only one part is shown at a time.
Settings in Lighting (again, both parts)
collectively define a scheme or style that can be
named, saved, and later retrieved from the pulldown list
marked with a black triangle in the Lighting Settings area.
Choosing a style from the list automatically applies it.
When the name Chimera default is shown, it is only
possible to save to a different name, using Save As....
When another name is shown, it is possible to
- Save the current settings to the name shown
- use Save As... to save the current settings
with a new name
- Delete the style whose name is shown
Named lighting styles are saved in the Chimera
preferences
file, and are only updated with any changes
when Save, Save As..., or Delete is used.
The settings in effect when a session is
saved
(whether or not the style has a name) are included in the
session file.
A lighting style can also be saved, applied, or deleted with the
lighting command.
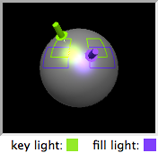
The Intensity section includes:
- mode - the number and type of lights
(details...):
- ambient - ambient light only
- single
- ambient light and one directional light
(the key light)
- two-point (default)
- ambient light and two directional lights:
key and
fill
- three-point
- ambient light and three directional lights:
key,
fill, and back
By default, only the key light gives specular highlights, and the other lights
are treated as shadowless during raytracing.
The directional lights can be moved interactively by dragging the
color-coded solid arrows on the sphere
(green:key,
purple:fill,
red:back).
The back light is restricted to the rim of the sphere and is not included
in the brightness.
Outlines on the sphere in the two- and three-point modes
represent commonly used light positions.
- brightness (default 1.16)
- the total illumination along the line of sight,
disregarding any specular contributions; slider values range 0.0-2.0
- contrast (default 0.83)
- darkness of shading; at a given brightness B, decreasing the
contrast C increases the ambient light: A = B(1 – C).
Contrast does not apply to the ambient-only mode. Values range 0.0-1.0.
- key-fill ratio (default 1.25)
- the ratio of (directional key + ambient) to (directional fill + ambient),
disregarding any specular contributions;
applies only to the two-point and three-point modes.
Values range from 1.0 to an upper bound that depends on the contrast.
The Shininess interface controls the specular
parameters of the viewed objects (rather than the light sources).
Although part of the Lighting tool,
Shininess is also handled
as a separate tool in the Viewing Controls category.
See also: lighting,
lighting details
- sharpness (default 30.0, range 1.0-128.0)
- refers to the “spread” of highlights;
lower values yield larger, more diffuse highlights,
while higher values yield more pointlike highlights. Technically,
sharpness is the OpenGL specular exponent. The effective highlight
intensity varies as the cosine of the angle between the view direction
and the direction of the reflected light, raised to the power of this exponent.
- reflectivity (default 1.0, range 0.1-10.0)
- scale factor for the components of the specular color (below).
The resulting values may exceed 1.
- color
(a color well, a light gray by default)
- specular color, that used for shiny highlights.
It is added to the color that would be shown in the absence of highlights.
If the color is already bright white, highlights will not be discernable;
if the color is nominally green and the specular color is red,
the highlights will appear to be yellow.
This explanation assumes that all light sources are white or gray; however,
lights have their own diffuse and specular colors,
which must be combined with
that of the material.
The Shininess interface
adjusts the material properties of the Chimera default material.
Stick, ball-and-stick, sphere, and ribbon
representations
and molecular surfaces
use the default material. It is not possible to independently
control the shininess of different models that use the default material.
Except for surfaces generated by
Volume Viewer and
Multiscale Models (for which special code was written),
the properties of models that do not use the default material
(VRML models, for example) are not adjusted.
UCSF Computer Graphics Laboratory / January 2026