import chimera
First, we'll open up a model to work with. This molecule (4fun) is very small,
comprised of just a couple residues, but it is perfect for illustrating
some important components of Chimera's object model.
For more information on how to open/close models in Chimera, see the
"Basic Model Manipulation" Example in the Programmer's Guide (coming soon). For now,
just understand that this code opens up any molecules stored in the file
Because only one molecule was opened,
Now that we have a molecule to work with, an excellent way of examining its data structures is to flatten it out and write
it to a file. We'll write this file in the
mol2 uses a series of Record Type Indicators (RTI), that indicate the type of structure that will be described in
the following lines.
An RTI is simply an ASCII string which starts with an asterisk (
The next line contains the name of the molecule. This can be accessed through the
Next, we need to write out the number of atoms, number of bonds, and number of substructures in the model (substructures
can be several different things; for the sake of simplicity, the only substructures we'll worry about here are residues).
This data is accessible through attributes of a molecule object:
save the list of references to all the bonds in
save the list of references to all the residues in
type of molecule
indicate that no charge-related information is available
Each line under the
You can look at each atom in the molecule by looping through its
Now that we have a reference to an atom, we can write out all the necessary information to the file.
The first field is an arbitrary id number. We'll just use that atom's index within the
Next, we need the name of the atom, which is accessible via the
Now for the x, y, and z coordinate data.
Get the atom's
The next field in this atom entry is the atom type. This is a string which stores information about the
chemical properties of the atom. It is accessible through the
The last two fields in an atom entry pertain to any substructures to which the atom may belong.
As previously noted, we are only interested in residues for this example.
Every atom object has a
Here, we'll use
The last field to write is substructure name. Here, we'll use the
Each line after the bond RTI contains information about one bond in the molecule.
As noted earlier, you can access all the bonds in a molecule through the
each bond object has an
The first field in a mol2 bond entry is an arbitrary bond id. Once again, we'll just use that
bond's index in the
The next two fields are the ids of the atoms which the bond connects. Since we have a reference to both these
atoms (stored in
The last field in this bond entry is the bond order. Chimera doesn't currently calcuate bond orders,
but for our educational purposes here, this won't be a problem.
The mol2 format expects bond order as a string: "1" (first-order), "2" (second-order), etc., so
just write out "1" here (even though this may not be correct).
We've already covered some of these items (see above):
residue id field
residue name field
the next field specifies the id of the root atom of the substructure. For the case of residues,
we'll use the alpha-carbon as the root.
Each residue has an
and get the id of
The final field of this substructure entry is a string which specifies what type of substructure it is:
And that's it! Don't worry if you didn't quite understand all the ins and outs of the mol2 file format.
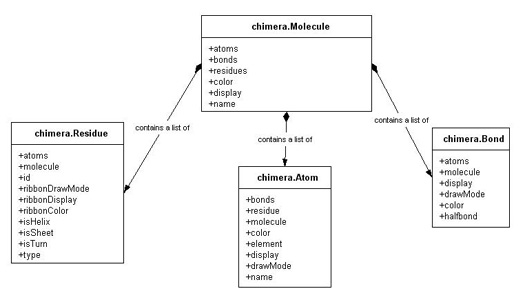
The purpose of this exercise was to familiarize yourself with Chimera's object model; writing out a mol2 file
was just a convenient way to do that. The important thing was to gain an understanding of how Chimera's atoms,
bonds, residues, and molecules all fit together. The goal of any molecular modeling system is to enable researchers to visualize their data.
Equally important as the attributes that describe chemical structure, are those that control how
the structures are actually represented on-screen. In fact, an extensive object model is worthless unless the
objects can be represented in a suitable manner! The display of Chimera's core objects is governed by
a few key concepts:
Chimera uses a hierarchical
system to color fundamental chemical components. This hierarchy is composed of two levels: 1) individual
atoms/bonds/residues and 2) the model as a whole.
The Each of Chimera's objects has an attribute which determines if it is displayed (visible) or not. For atoms,
bonds, and molecules this is called
open up a molecule to work with:
To color the molecule red,
get a reference to Chimera's notion of the color red (returns a
and assign it to
Note that the model will appear red at this point because all the atoms/bonds/residues
get a list of all the atoms in the molecule
check to see if this atom is an alpha-carbon
Now, even though
Like molecules, atoms also have a
only for residues that are part of an alpha-helix4fun.pdb and returns a list of references to opened models.
opened = chimera.openModels.open('4fun.pdb')
opened is a list with just one element.
Get a reference to that element (which is a Molecule
instance) and store it in mol
mol = opened[0]
mol2 format, a free-format ascii file that describes molecular structure.
It is not necessary to have any prior knowledge of the mol2 format to understand this example, just a basic
comprehension of file formats that use coordinate data. Check out the finished product.
It should serve as a good reference while you're going through the example.
Get a reference to a file to write to:
f = open("4fun.mol2", 'w')
@), followed by a string of characters,
and is terminated by a new line.
Here, we define some RTI's that we will use througout the file to describe the various parts of our model:
MOLECULE_HEADER = "@<TRIPOS>MOLECULE"

ATOM_HEADER     = "@<TRIPOS>ATOM"

BOND_HEADER     = "@<TRIPOS>BOND"

SUBSTR_HEADER   = "@<TRIPOS>SUBSTRUCTURE"
Writing Out per-Molecule Information
The "@<TRIPOS>MOLECULE" RTI indicates that the next couple of lines will contain information relevant
to the molecule as a whole. First, write out the Record Type Indicator (RTI):
f.write("%s\n" % MOLECULE_HEADER)
mol.name attribute.
(Remember, mol is a reference to the molecule we opened). If the model you open came from a pdb file, name will most
often be the name of the file (without the .pdb extension). For this example, mol.name is "4fun".
f.write("%s\n" % mol.name)
mol.atoms, mol.bonds, and mol.residues all contain
lists of their respective components. We can determine how many atoms, bonds, or residues this
molecule has by taking the len of the appropriate list.
save the list of references to all the atoms in mol:
ATOM_LIST = mol.atoms
mol:
BOND_LIST = mol.bonds
mol:
RES_LIST  = mol.residues


f.write("%d %d %d\n" % ( len(ATOM_LIST), len(BOND_LIST), len(RES_LIST)) )
f.write("PROTEIN\n")
f.write("NO_CHARGES\n")


f.write("\n\n")
Writing Out per-Atom Information
Next, write out atom-related information. In order to indicate this, we must first write out the
atom RTI:
f.write("%s\n" % ATOM_HEADER)
ATOM RTI consists of information pertaining to a single atom. The following information about each
atom is required: an arbitrary atom id number, atom name, x coordinate, y coordinate, z coordinate, atom type, id of the
substructure to which the atom belongs , name of the substructure to which the atom belongs.
atoms attribute.
Remember, ATOM_LIST is the list of atoms stored in mol.atoms. It's more efficient
to get the list once, and assign it to a variable, then to repeatedly ask for mol.atoms.
for atom in ATOM_LIST:
mol.atoms list.
f.write("%d " % ATOM_LIST.index(atom) )
name attribute.
f.write("%s " % atom.name)
xformCoord object. This is essentially a wrapper that holds information about the
coordinate position (x,y,z) of that atom. xformCoord.x, xformCoord.y, and xformCoord.z store the x, y,
and z coordinates,
respectively, as floating point integers. This information comes from the coordinates given for each atom
specification in the input file
coord = atom.xformCoord()

f.write("%g %g %g " % (coord.x, coord.y, coord.z) )
idatmType attribute of an atom object.
Because Chimera uses slightly different atom types than SYBYL (the modeling program for which .mol2 is the primary
input format), use a dictionary called chimera2sybyl (defined elsewhere) that converts Chimera's atom types to
the corresponding SYBYL version of the atom's type.
f.write("%s " % chimera2sybyl[atom.idatmType])
residue attribute, which is a reference to the residue to which that atom belongs.
res = atom.residue
res.id for the substructure id field. res.id is a string which represents a unique id
for that residue (a string representation of a number, i.e. "1" , which are sequential, for all the
residues in a molecule).
f.write("%s " % res.id)
type attribute of res. the type attribute contains
a string representation of the residue type (e.g. "HIS", "PHE", "SER"...). Concatenate onto this the residue's id
to make a unique name for this substructure (because it is possible, and probable, to have more than one
"HIS" residue in a molecule. This way, the substructure name will be "HIS6" or "HIS28")
f.write("%s%s\n" % (res.type, res.id) )


f.write("\n\n")
Writing Out per-Bond Information
Now for the bonds. The bond RTI says that the following lines will contain information about bonds.
f.write("%s\n" % BOND_HEADER)
bonds attribute,
which contains a list of bonds.
for bond in BOND_LIST:
atoms attribute, which is list of length 2, where each item in the list is
a reference to one of the atoms to which the bond connects.
a1, a2 = bond.atoms
mol.bonds list
f.write("%d " % BOND_LIST.index(bond) )
a1 and a2), we can just get the index of those objects in the mol.atoms list:
f.write("%s %s " % (ATOM_LIST.index(a1), ATOM_LIST.index(a2)) )
f.write("1\n")


f.write("\n\n")
Writing Out per-Residue Information
Almost done!!! The last section contains information about the substructures (i.e. residues for this example)
You know the drill:
f.write("%s\n" % SUBSTR_HEADER)
for res in RES_LIST:
f.write("%s " % res.id )
f.write("%s%s " % (res.type, res.id) )
atoms attribute which is a dictionary. The keys in this dictionary are
atom names (e.g. C, N, CA), and the values are lists of references to atoms in the residue that have that
name. So, to get the alpha-carbon of this residue:
alpha_carbon = res.atoms['CA'][0]
alpha_carbon from the mol.atoms list
f.write("%d " % ATOM_LIST.index(alpha_carbon) )
f.write("RESIDUE\n")


f.write("\n\n")

f.close()
Display Properties
Color Hierarchy
color assigned to an individual atom/bond/residue will
be visible over the color assigned to the model as a whole.
When a model is initially opened, each atom/bond/residue color
is set to None, and the model-level color
is determined by a
configurable preference
(by default, Chimera automatically assigns a unique model-level color to each new molecule that is opened).
Because all the components' (atoms/bonds/residues) color attributes are
initially set to None, they (visually) inherit their color from the model-level color.
However, setting any particular atom's color,
or issuing a command
such as 'color blue' (which is the same as setting each individual atom's color to blue) will result in the
model appearing blue (because either of those actions affect an individual atoms' color,
which takes visual precedence over the model-level color).
See here for more information.
Display Hierarchy
display,
while residues have a ribbonDisplay
attribute (residues are represented visually as ribbons). A value of True means that the component is displayed, while False means it is not displayed.
An atom/bond/residue will only be displayed if the model to which it belongs is displayed. This means that
even if an atom/bond/residue's respective display attribute is set to True, if the molecule to which
that atom belongs is undisplayed
(i.e. the molecule's display is set to False), then that atom/bond/residue will still not be visible.
See here for more information.
Draw Modes
Each Chimera object can be drawn in one of several representations ('draw modes'), specific to that object.
atoms and bonds
each have an attribute named drawMode that controls this characteristic, while residues'
(because they are represented as ribbons) corresponding attribute is
called ribbonDrawMode. The value of this attribute is a constant which corresponds to a certain type of
representation specific to that object.
For example, chimera.Atom.Dot, chimera.Atom.Sphere, chimera.Atom.EndCap
and chimera.Atom.Ball are constants that each define a different draw mode for atoms.
There is a different set of constants that define draw modes for bonds and residues (see below for more information).
Example displayProp.py
import chimera
opened = chimera.openModels.open('3fx2', type="PDB")

mol    = opened[0]
Molecule Display Properties
the color attribute represents the model-level color.
This color can be controlled by the midas command modelcolor.
The color assigned to a newly opened model is determined by a configurable preference (see discussion above).
Programmatically, the model
color can be changed by simply assigning a MaterialColor to molecule.color. Molecules also have a
display attribute, where a value of True corresponds to being displayed, and a value of False
means the molecule is not displayed.
So to make sure the molecule is shown (it is by default when first opened):
mol.display = True
MaterialColor object)
from chimera.colorTable import getColorByName

red = getColorByName('red')
mol.color.
mol.color = red
color attributes are set to None
Atom Display Properties
Each atom in a molecule has its own individual color,
accessible by the color attribute. Upon opening a molecule, each atom's color is set to None;
it can be changed by assigning a new MaterialColor to atom.color.
So, if we wanted to color all the alpha-carbon atoms blue, and all the rest yellow,
get references to the colors:
blue    = getColorByName('blue')

yellow  = getColorByName('yellow')
ATOMS = mol.atoms

for at in ATOMS:
if at.name == 'CA':
else:
mol.color is set to red, the molecule will appear to be blue and yellow. This is because each individual
atom's color is visible over mol.color.
display attribute that controls whether or not the atom is shown.
While atom.display controls whether the atom can be seen at all, atom.drawMode controls its visual representation.
The value of drawMode can be one of four constants, defined in the Atom class.
Acceptable values for drawMode
are chimera.Atom.Dot (dot representation), chimera.Atom.Sphere (sphere representation),
chimera.Atom.EndCap (endcap representation), or chimera.Atom.Ball (ball representation).
So, to represent all the atoms in the molecule as "balls":
for at in ATOMS:
Bond Display Properties
Bonds also contain color, and drawMode attributes. They serve the same purposes here as they do
in atoms (color is the color specific to that bond, and drawMode dictates
how the bond is represented). drawMode for bonds can be either chimera.Bond.Wire (wire representation)
or chimera.Bond.Stick (stick representation).
The bond.display attribute accepts slightly different values than that of other objects.
While other objects' display can be set to either False (not displayed)
or True (displayed), bond.display can be assigned a value of chimera.Bond.Never (same as False - bond is not
displayed), chimera.Bond.Always (same as True - bond is displayed), or chimera.Bond.Smart which means that the
bond will only be
displayed if both the atoms it connects to are displayed. If not, the bond will not be displayed.
The heuristic that determines bond color is also a little more complicated than for atoms.
Bonds have an attribute called halfbond
that determines the source of the bond's color. If halfbond is set to True, then the
bond derives its color from the atoms which
it connects, and ignores whatever bond.color is. If both those atoms are the same color (blue, for instance),
then the bond will appear blue. If the bonds atoms are different colors, then each half of the bond will correspond to the color
of the atom on that side. However, if bond.halfbond is set to False, then that bond's color
will be be derived from its color attribute, regardless of the colors of the atoms which it connects (except in the case
bond.color is None, the bond will derive its color from one of the atoms to which it connects).
To set each bond's display mode to "smart", represent it as a stick, and turn halfbond mode on,
get a list of all bonds in the molecule
BONDS = mol.bonds
for b in BONDS:
b.drawMode = chimera.Bond.Stick
b.halfbond = True
Residue Display Properties
Residues are not "displayed" in the same manner that atoms and bonds are. When residues are displayed, they are
in the form of ribbons, and the attributes that control the visual details of the residues are named accordingly:
ribbonDisplay, ribbonColor, ribbonDrawMode. The values for ribbonDrawMode can be chimera.Residue.Ribbon_2D (flat ribbon),
chimera.Residue.Ribbon_Edged (sharp ribbon), or chimera.Residue.Ribbon_Round (round/smooth ribbon).
If a residue's ribbonDisplay value is set to False, it doesn't matter what ribbonDrawMode
is - the ribbon still won't be displayed!
Residues have three attributes that control how the ribbon is drawn. isTurn, isHelix, and isSheet (same as isStrand) are
set to either True or False based on secondary structure information contained in the source file (if available).
For any residue, only one of these can be set to True.
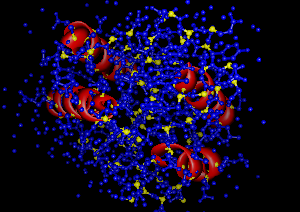
So, to display only the residues which are part of an alpha-helix, as a smooth ribbon,
get a list of all the residues in the molecule
RESIDUES = mol.residues

for r in RESIDUES:
if r.isHelix:
This leaves us with a very colorful (if a little scientifically useless) model!!
r.ribbonDrawMode = chimera.Residue.Ribbon_Round