
Lenses are regions of alternative display that can be moved around within the graphics window. Lenses are created and managed using the Lens Inspector. There are several ways to start the Lens Inspector, a tool in the Inspectors category.
Three types of lens are built into Chimera:
The background is the highest level of the hierarchy. A lens created within another is a child of the first, or parent, lens. Children of the same parent are siblings. Sibling lenses can be in front or in back of each other. A child lens is effectively in front of its parent.
The net effect of overlapping lenses depends on the front/back ordering and whether each lens is of the masking or overlay type. Masking lenses override operations specified by underlying lenses; overlay lenses include such operations.
Highlight lenses are masking, whereas sidechain lenses are of the overlay type.
To create a lens, first open the Lens Inspector (choose Settings... Lenses from the menu). The Lens Inspector has two sections shown as index cards, Manager and Inspector; only one card is shown at a time, and clicking the tab for the other brings it to the front. Dismiss closes the Lens Inspector. Help opens the manual page on lenses in a browser window.
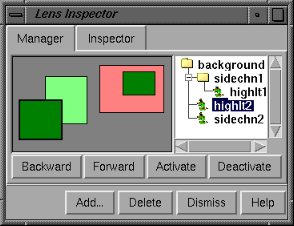 The Manager section includes
a stylized representation of the graphics window and any lenses within
it (on the left), and a tree diagram showing the existing lens hierarchy
(on the right). Before any lenses have been created, only the
background lens is listed on the right.
The Manager section includes
a stylized representation of the graphics window and any lenses within
it (on the left), and a tree diagram showing the existing lens hierarchy
(on the right). Before any lenses have been created, only the
background lens is listed on the right.
In the Manager, the current lens is indicated by a heavy black border in the schematic on the left and highlighting of its name on the right. A different lens can be made the current lens by clicking on its representation in the schematic or on its name. Various button operations act only upon the lens that is current. Double-clicking a name allows the name to be edited.
Clicking Add... opens another window which requests the type of lens to add and how to add it with respect to the current lens. Note that there must be a current lens in order to add a new lens. If the background is the current lens, a new lens can only be added within it; if another lens is current, however, the new lens can be added within, in front of, or behind it. Clicking Add within this further window creates the new lens. It is shown in the main graphics window as a dashed outline, and within the Manager as a rectangle in the schematic on the left and as a name in the tree diagram on the right. The dashed outline in the main graphics window may be turned off or its color changed in the Background preferences. In the schematic, masking lenses are shown in dark green (red if deactivated) and overlay lenses are shown in light green (light red if deactivated). A newly added lens becomes the current lens. Delete removes the current lens and its children, if any.
Only lenses of the highlight type may be further defined. First, the highlight lens of interest must be made the current lens (if it is not already).
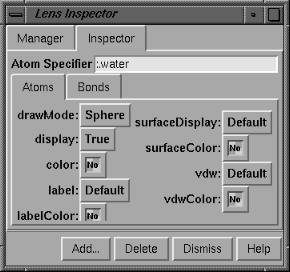 The lens properties are defined within
the Inspector section of the Lens Inspector. If the
properties are meant to apply to specific atoms and bonds rather
than all open models,
an
atom specification must be entered
in the top field (sel, selected, and picked cannot be
used here) followed by return (Enter).
Highlight lenses are classified as masking,
because for the specified atoms and bonds, the
background display is overridden when settings other than Default
and No color are chosen.
Atoms and bonds not included in the atom specification will not be
affected by the lens; they will be drawn as they are in the background.
Display properties of the atoms and bonds included in the atom specification
are set within the Atoms and Bonds cards of the Inspector.
Clicking on any color well
opens the Color Editor.
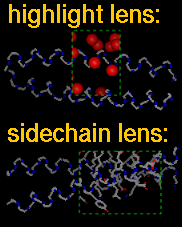
Shown here is the definition of the highlight lens in
the figure near the top of the
page. ":.water" specifies the water chain
(only water oxygens are present in the structure);
the drawMode of these atoms is set to Sphere
and display is set to True since they are undisplayed in
the main window. The atoms (although undisplayed) are already colored red
in the main window. The color setting of No means that the
lens does not change the color from its background setting.
Since the backbone N, C, and CA atoms are displayed in the background,
they are also displayed within the lens.
The lens properties are defined within
the Inspector section of the Lens Inspector. If the
properties are meant to apply to specific atoms and bonds rather
than all open models,
an
atom specification must be entered
in the top field (sel, selected, and picked cannot be
used here) followed by return (Enter).
Highlight lenses are classified as masking,
because for the specified atoms and bonds, the
background display is overridden when settings other than Default
and No color are chosen.
Atoms and bonds not included in the atom specification will not be
affected by the lens; they will be drawn as they are in the background.
Display properties of the atoms and bonds included in the atom specification
are set within the Atoms and Bonds cards of the Inspector.
Clicking on any color well
opens the Color Editor.
Shown here is the definition of the highlight lens in
the figure near the top of the
page. ":.water" specifies the water chain
(only water oxygens are present in the structure);
the drawMode of these atoms is set to Sphere
and display is set to True since they are undisplayed in
the main window. The atoms (although undisplayed) are already colored red
in the main window. The color setting of No means that the
lens does not change the color from its background setting.
Since the backbone N, C, and CA atoms are displayed in the background,
they are also displayed within the lens.
Lenses may be moved and resized in the Manager section of the Lens Inspector (using the left mouse button) or within the main graphics window (by default, using Ctrl-right mouse button; this button assignment can be changed in the Mouse preferences). Placing the cursor on a border or corner of a lens or its representation allows resizing, whereas placing it in elsewhere in the lens or its representation allows translational movement. Only rectangular shapes are possible. Of course, the contents of the graphics window can be moved and scaled as usual while the lenses remain fixed. Resizing the graphics window, however, also resizes any lenses.
Lens management is done within the Manager section of the Lens Inspector. Active lenses are green (light green for overlay lenses and dark green for masking lenses). Clicking Deactivate removes the effect of the lens, undisplays its dashed outline in the main graphics window, and turns its representation in the schematic to red (light red for overlay lenses and dark red for masking lenses). A child of a deactivated parent lens is effectively also deactivated although it is still shown as green in the schematic. Activate reactivates the current lens if it has been deactivated. Backward and Forward move the current lens backward and forward in the main graphics window and up and down in the tree diagram, respectively. Only lenses with at least one sibling can be moved forward or back. Delete removes the current lens and its children, if any.
For a programmer's perspective, see the Example on Lenses in the Chimera Programmer's Guide.