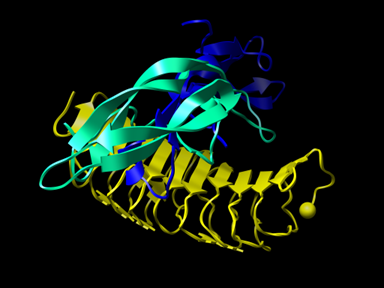
Follicle-stimulating Hormone (FSH) — Receptor Complex
Chimera has three interactive methods for manipulating data: the graphical user interface (GUI), the command line (Tools / General Controls / Command Line), and Python code (Tools / General Controls / IDLE). Except for the GUI, the typed-in commands can can be scripted, i.e., replayed from a file. Chimera also provides a Demo tool to organize scripts with a simple GUI that steps through the script and provides explanatory text.
Scripts are an excellent way to create content for animations.
This tutorial will cover developing scripts from commands,
from Python code, and organizing them with the Demo Editor tool.
It is organized as follows:
Follicle-stimulating Hormone (FSH) — Receptor Complex
| line | |
|---|---|
| 1 | # |
| 2 | # Chimera command script showing green fluorescent protein (PDB 1gfl) |
| 3 | # |
| 4 | 2dlabels create lab1 text 'Green Fluorescent Protein' color light sea green size 26 xpos .03 ypos .92 visibility show |
| 5 | open 1gfl; del ~ :.a; window; linewidth 3; scale 1.6; rainbow; wait |
| 6 | sleep 3 |
| 7 | chain @n,ca,c,o; wait 1 |
| 8 | sleep 3 |
| 9 | ~disp; ribbon |
| 10 | 2dlabels change lab1 visibility hide frames 90; wait |
| 11 | 2dlabels delete lab1 |
| 12 | roll y 1 180; wait |
| 13 | ribrepr edged |
| 14 | roll y 1 180; wait |
| 15 | ribrepr smooth |
| 16 | roll y 1 180; wait |
| 17 | ribbackbone; repr sphere :1.a,230.a@ca; color white,a :1.a,230.a@ca; disp :1.a,230.a@ca |
| 18 | roll y 1 90; wait |
| 19 | scale 1.015 20; wait |
| 20 | disp :65-67.a; color byatom :65-67.a; repr cpk :65-67.a; wait 1 |
| 21 | clip hither -1 20; wait |
| 22 | sleep 5 |
| 23 | clip hither 1 20; wait |
| 24 | scale 0.98 10; wait |
| 25 | disp :99.a,153.a,163.a,167.a,202.a,203.a,222.a;repr bs :99.a,153.a,163.a,167.a,202.a,203.a,222.a; ribrepr flat |
| 26 | sleep 2 |
| 27 | roll y 1 180 |
| 28 | echo script finished |
Take this time to review the frame-based commands, examine the example command file 1gfl.com — duplicated above in a table with reference line numbers, and run it.
There are many chimera idioms in that script:
window; scale 1.6 — The window command causes the view to be centered around the molecule such that it can be rotated in any direction and still be completely visible. Usually, that leaves some extra space around the molecule. So the view is scaled up.
linewidth 3 — makes the lines more visible. This is useful when using an overhead projector. An alternative would be to use sticks for the atoms and bonds.
wait — a historical artifact from when scale commands without a frame count were delayed as if the count were one.
If the script opened a session file,
then much more can prepared in advance.
The savepos and reset commands
can save and restore positions.
Selections can be saved for simpler manipulation, using
Name Selections....
The Demo Editor tool
If you haven't done so already, save the 1gfl.com file (as a text file) so you can copy & paste lines from it (the realistic scenario). Or you can scroll back to the previous section and copy & paste from there.
Next, run a demo to see what they're like. Either the Tools / Demos / COX Inhibitors Demo or the Tools / Demos / Hormone-Receptors Complex Demo. You will see a sequence of panels with explanations about what is happening in the main graphics window.
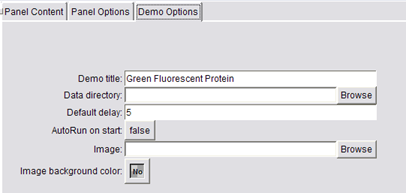
Demo Options
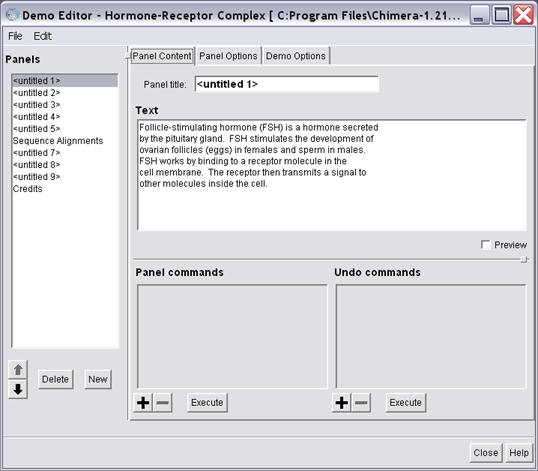
Now, bring up the Demo Editor dialog, Tools / Demos / Demo Editor. The Demo Editor has two parts, the list of demo panels and a tabbed control to select between Panel Content, Panel Options, and Demo Options. Start with Demo Options and set the title of your demo. You can also change the image from the default chimera logo. Switch back to Panel Content when you're done.
Deciding what should be in a demo and in what order is beyond the scope of this tutorial. Instead, you are going to break up the contents of the 1gfl.com script into panels by using the natural breaks given by the sleep commands, so each panel will be the code in between. Each panel is created by clicking the New button under the Panels section. You will need five panels for this exercise.
1gfl.com starts with displaying a 2D label with the name of the protein. Since the demo provides a separate panel for text, that should be moved over to the Text portion of the Panel Content. It would also be nice to credit the paper that originally presented the solved protein structure — if you File / Fetch 1gfl, you can get the PDB headers with that information by bringing up the Favorites / Model Panel, clicking attributes..., and then clicking PDB Headers.... To copy & paste, use the mouse to select text and the normal keyboard shortcuts for your platform.
Next, create an empty Panel Command by clicking the + button. And copy line 5 of 1gfl.com, starting with open 1gfl. You are now done with the first panel.
Next fill in the rest of the panels by copy & pasting the command in 1gfl.com into the appropriate Panel Commands. The hardest part might be deciding what the test for each panel should be.
Finally, show your demo to someone else.
For this tutorial and in general, experiment with Python code in chimera by using the Tools / General Controls / IDLE tool. Another method is to create Python code using your favorite text editor, and running chimera from a terminal shell (on Windows, the Command Prompt) with that file as an argument. If you give the --nogui option to chimera, you can use chimera to do batch molecular computations. Python scripts can executed in chimera by opening the file, either through File / Open or with the open command.
Before continuing, go to the Chimera Programmer's Guide and go through the first two examples: Chimera's Object Model and Molecular Editing Using Python.
The Python code is naive:
import chimera
from chimera import runCommand
runCommand('open 1gfl')
import Midas
modellist = Midas.open('1gfl')
And then you can interate through the modellist
and manipulate the models programmatically.
To find out all of the functions using IDLE, type:
import Midas
help(Midas)
And you'll see all of the functions provided by the Midas module.
In general, there is a one-to-one correspondence to the commands
listed in the User's Guide. Python's help function works everywhere.
If you are looking for coding examples beyond what is provided in
the Programmer's Guide, looking at the source to the Midas module
is very instructive, particularly CHIMERA/share/Midas/__init__.py,
where CHIMERA is where chimera is installed.
Here are links to more information about the topics covered in this tutorial: